All posts by Drunken Chef

Lesson Eight: Sandwiches Part Two

May 16, 2021

Lunch is yummy whether you are at a campsite, in the park, at school or like I am today, home and just relaxing. Lunch can be a wide and varied menu so it changes with the seasons just like dinner. On a really hot summer day you will probably only want to make those previous easy sandwiches but on cooler days perhaps you want something warmer. On really cold days it calls for soup and a sandwich. We will cover soups when it is cold outside here in New York, so don’t worry!    

           As we step up our game and things get more complicated they can be a little bit trickier but don’t despair. You should be able to make all these tasty treats and with just a little practice you will be making them perfect.

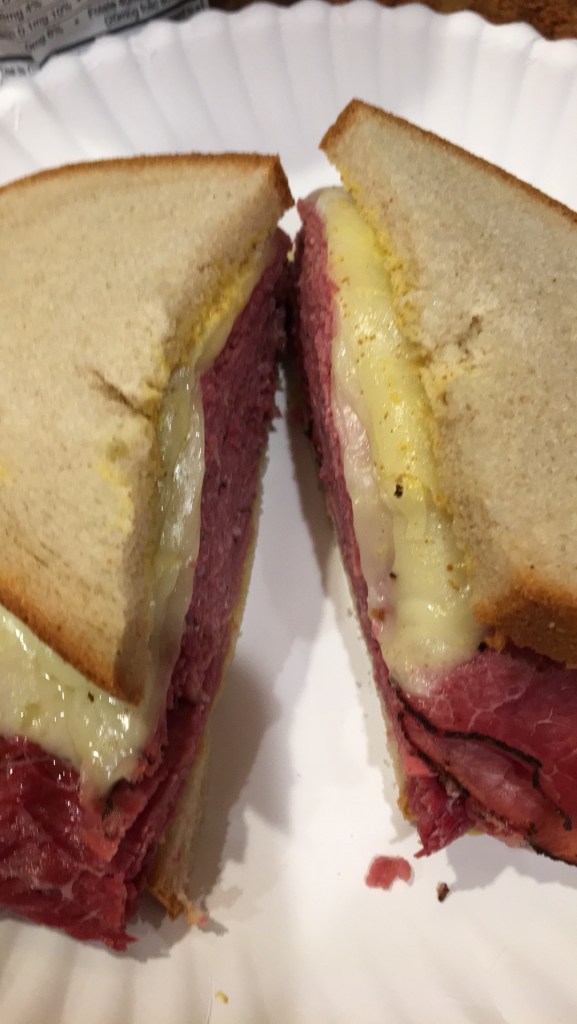
            Once in a blue moon or even on Fridays during lent I make Tuna fish salad. I try not to eat tuna very much anymore. Especially after my wife was told that, she should not eat it too often while trying to conceive or when she was pregnant! YIKES! That was the first time I ever heard that! What the $#%&! What do you mean fish is not good for you?! What did we do to our oceans?!  I was being told this almost second hand too. If I was not in the doctor’s office for her appointment I may have never learned about this dreaded fact. Now I may be over reacting just a bit, but I don’t want to be as mad as a hatter from eating too much tuna or shell fish either. Sheesh, we have to stop polluting our oceans with garbage….Okay rant over for today.

            Back to lunch, but I may need a beer first.

            The first sandwich is tuna salad. Now you may ask why was that not in the easy category? The answer is simple, my earliest memories of tuna fish was of my sister making it in the kitchen. She did cook much but when she did it was tuna fish, bacon and popcorn. YES! Before the microwave was invented you had to COOK popcorn! You had to clarify the butter yourself and even add the salt. This all had to happen before you could start watching the Wonderful World of Disney that appeared on ABC on a Sunday night.

            One can of tuna fish requires chopped onion, celery and mayonnaise. See how all this cooking stuff comes full circle. We learned about chopping when we wanted an omelet with more than just cheese in it! Begin your tuna dish by finely chopping a bit of onion about 1 tablespoon. One tablespoon of finely chopped celery is next. Add the onion and celery to a bowl with the tuna fish from a can after it is thoroughly drained. Canned tuna fish comes in several different types. Light tuna (according to the FDA) has less mercury in it then solid white tuna. Wouldn’t you know it, I grew up on solid white tuna. Maybe that explains a lot! It also comes packed in oil or water. I can’t tell the difference so I buy it packed in water to make my wife happy. She hardly ever eats the stuff anyhow. Add the mayonnaise to taste. I use Hellman’s mayonnaise. My taste dictates that a lot of mayonnaise should be used in my tuna salad. Three or 4 tablespoons, perhaps more if it looks too dry.

            Then the white bread MUST be very fresh or it has to be toasted! Mayo on the bread, tuna (the whole can) and lettuce. Done. Do you remember getting two sandwiches out of one can of tuna fish? Just like everything else, things keep getting smaller and smaller. Everything but my waistline. Maybe I should skip the bread and just put the tuna salad on a bed of iceberg lettuce.

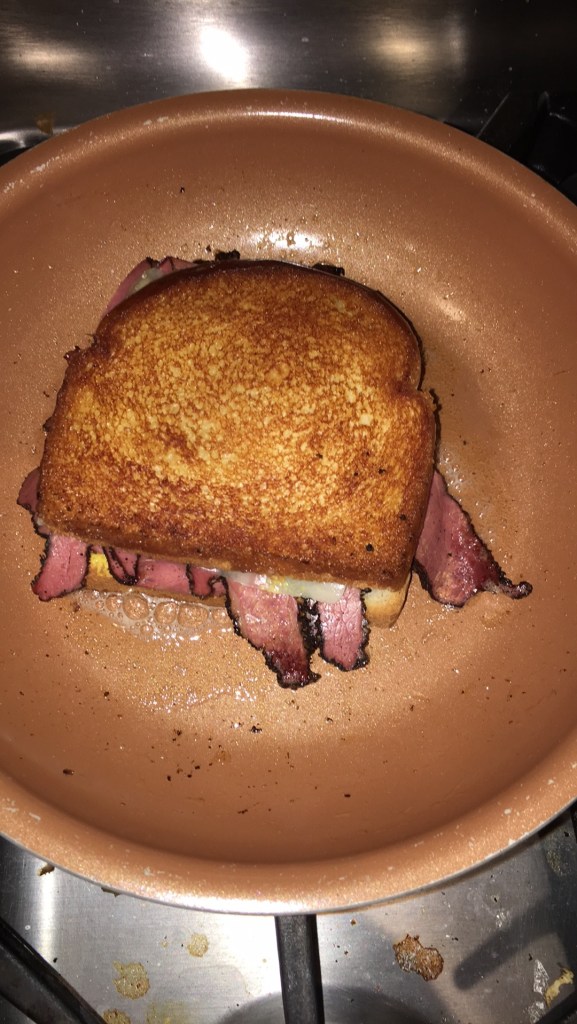
            During the summer, tuna is good as long as you’re not out in the hot sun! Then ewe. Another good thing in summer are the homegrown tomatoes from my back yard. I remember them being in my back yard even as a kid along with string beans growing on poles. If it’s summer and I have a tomato then I need to make at least one BLT. Please tell me you know what a B.L.T. is! Bacon Lettuce and Tomato!  You fried up bacon for breakfast, didn’t you? See this is why I started the lessons in this cookbook with breakfast. One technique will build on another and soon you’ll be a great chef, if you’re not already! Bobby Flay, I don’t think you have to read my cookbook but you can always stop buy for a lesson or a sandwich…just sayin. So back to bacon, is there any left from breakfast? If not, then fry some more up. I would make the whole pound. It can’t hurt as I have a sandwich or six that uses bacon in it.

            You have your crisp bacon. You made your white bread toast, lettuce, sliced beefsteak tomato from the garden and MAYO (thank you Mrs. Corolla)! Ba-bam! BLT. Its okay. Tasty and it really complements the tomato, but what if you don’t have home grown tomatoes. The tomato is the star of the show here. In that case we need to change it up a bit. Let us trade out that white toast for some pumpernickel or rye. Place on Turkey, Bacon, Lettuce, tomatoes, and (wait for it) Guacamole! YUM! Serve with a pickle and cold slaw!          

            Okay, now your cooking. Speaking of cooking. We have not grilled yet! But it’s summer…even better it almost Memorial Day weekend and the semiofficial beginning of summer! Thank you to all our veterans for their service. This is one of the biggest BBQ weekends of the year. So let see, how about grilled chicken for doing some cooking.

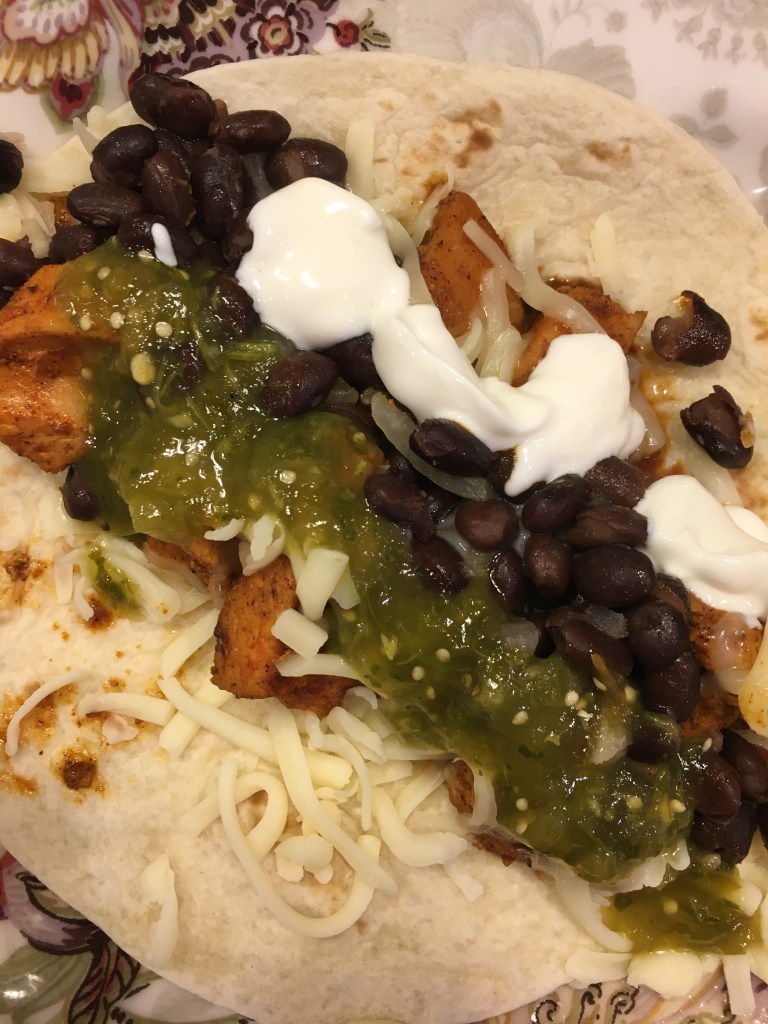
            Let’s fire up the grill! You will need one boneless skinless chicken breast sliced thinly in half so you now have two chicken breasts. Cut those in half. Coat them all with Italian salad dressing or a bit of olive oil. This helps it stick less to the grill. Quarter or slice thin a zucchini longways. Cut one red pepper in half along with one onion or maybe even a little eggplant. Coat all the vegetables with olive oil or the same Italian dressing you used on the chicken. Grill them all alongside the chicken! When the chicken is no longer pink and not over cooked so its dry as saw dust. Slice everything into strips inkling the vegetables. Place that’s on four flour Tortillas where you can add a slice of provolone cheese to each one and perhaps and some ranch dressing. Wrap it all up like a burrito and enjoy! A different  take on this idea should you want a meatless meal is the Vegetarian wrap – grilled Zucchini, asparagus, eggplant, tomatoes, peppers balsamic vinegar and olive oil.

            Too much chicken in the fridge? Either rotisserie or grilled? Let’s make some chicken salad. It is just like tuna salad only different. You need to make or buy a rotisserie chicken or have grilled or poached chicken breasts already done. Cut the chicken off the bone and dice it up. Your knife skills will soon improve and you will be cruising right through this by the end of the summer! Place it in a bowl and add grated carrot. Have we peeled and grated carrots before? Watch your knuckles!  Dice fine some celery. Add the carrots and the celery and some mayo to the bowl with the chicken. Now add spices: a pinch of garlic powder and a pinch of onion powder, a pinch of paprika, a pinch each of salt and pepper. Now you can add some mayonnaise one-table spoon at a time and mix until it looks good. Taste and season with any of the spices if needed. This can go on any bread or toast, matzah, or just on plain lettuce.   

Lastly, I need to discuss my all-time favorite mid-winter football day sandwiches. The Buffalo Chicken sandwich!

Buffalo Chicken Sandwich

COOKING UTENSILS NEEDED:

Fork, Frying Pan, Sauce Pot, Tongs, Air fryer for the Waffle Fries.

INGREDIENTS:

½ cup all-purpose flour

1 large egg beaten

½ teaspoon paprika

¼ teaspoon garlic powder

¼ teaspoon onion powder

¼ Cyan pepper

Pinch of salt

Pinch of black pepper

4 Boneless Chicken breasts

½ cup Vegetable oil

½ cup Franks Red Hot Sauce

Half stick butter

2 tablespoons Hunts original barbeque sauce

Hamburger buns, lettuce, tomato

2 teaspoons of Cholula

Blue Cheese salad dressing

DIRECTIONS:

Add flour, paprika, garlic, onion, parsley, salt and pepper into a large zip top bag. Dip one piece of chicken in egg then at a time and add the chicken to the bag of flour to coat.  Close bag securely and gently turn over until all sides for the chicken are evenly coated. For a thicker crust, repeat the last two steps. I sprinkle a little of the remaining flour mixture on top of each piece of chicken and let stand while the vegetable oil gets really hot.

In a small saucepot, melt half a stick of butter on low. Add hot sauce, barbeque sauce and Cholula©. Heat to a simmer on med-low, do not let it boil.

Heat oil in a large deep frying pan over medium high heat or high heat.

Using tongs carefully add chicken to the very hot oil. Place the chicken in the oil slowly using the tongs with the end going in the oil on the side of the pan that is away from you. So that if that accidently drop the chicken in the oil it splashes toward the BACK of the stove not toward your chest!  Cook chicken until deep brown and chicken has no pink in the middle. You can use and instant read thermometer to test and read 160ºF. Remove the chicken from pan to a plate to drain off any grease on some paper towels. Place chicken on a Martinson extra-large sesame seed hamburger bun.  Pour ¼ of the sauce over the chicken. Top with blue cheese salad dressing, lettuce and tomato.  Serve with Waffle fries or French fries, pickles and/or cold slaw.           

Whew! That’s lunch! I guess we should start dinner soon by grilling…

Until tomorrow Stay Safe, remain healthy, be happy and eat well!

The Drunken Chef (AKA Russ)

© Russ Ahrens and The Magic of a Perfect Pairing,2023


Lesson Eight: Sandwiches vs School Lunch

May 15, 2021


Lunch: This was always my favorite time of the day; even as far as way back to my elementary school days. Back then, my mother gave me lunch money to buy the hot school lunch. Ah, what joyous memories I have of standing in line in the hall, waiting for my turn at picking up the school lunch tray, sliding it along the chrome rails and selecting my meal for the day. Every year seemed slightly different as the group of friends that I sat with at lunch changed from year to year. Of course, the teachers changed too, some were better at making sure you had your monthly lunch schedule. You needed the lunch schedule in your hand so you could choose what to eat in advance. It was good if you needed to bring lunch in case you knew that the hot lunch was going to be terrible. Most things, luckily, that were on the lunch menu were okay to eat at school.

Particularly popular on the menu, even back then, was pizza! It was usually served on a Friday and if you had an extra 25 cents, you could get an extra slice of this tasty lunchtime treat. It was a rectangular slice of pizza that looked like Ellio’s pizza but the slices were much bigger and better tasting. They also had more cheese on them then Ellio’s pizza. I found a box of frozen pizza once in a supermarket that was made in Brooklyn. It tasted exactly like that old elementary school pizza and all those memories came flooding back. I think the manufacturer was called Bazzino’s or something. I just remember that it was my favorite meal at school.

Another good one was the meatball sub. Don’t ask me why, but those crappy meatballs in the sauce when compared to a lot of other things were delicious. I even enjoyed the bread, which was a six or eight inch long roll that was surprisingly fresh and tasty when all covered in sauce.  I even had that sandwich again at one of the schools I worked in many years ago. It smelled and tasted EXACTLY like the original and I felt like I was ten years old again, if only for a moment. The lunch woman that day was very nice when I told her my elementary school lunchroom experiences and she insisted that now I should try her meatball sub. I am very grateful to her for that. 

Back then the elementary school meal was not without its pit falls. For starters, the pizza was not always cooked to perfection. It varied in quality depending on where you were in line some days. Sometimes the pizza was too overcooked for my liking. If the pizza was totally brown (and some days it was) it was not very good. It may still be edible but I was not going to waste the extra quarter for a second slice only to throw it away, I saved it for ice cream or candy. There were other meals that were not as tasty as pizza but were edible. Hamburger day was not bad and if I remember it correctly, it did come with some kind of weird French fry item that you could cover in ketchup and eat. Next down in line was grilled cheese day. This was also a Friday food item served probably in the weeks leading up to the Easter break. If the grilled cheese was in the oven keeping warm too long, it was hard as a rock and inedible. The worse meal by far was the dreaded TUNA MELT served on good Friday! There was nothing good about Good Friday during lunch. The meal was tuna fish served in a hot dog bun that had melted American cheese on top. Then the whole thing was warmed up in the pizza oven to melt the cheese and make the bun hard as a brick…YIKES! I went hungry that day! To this day, I can’t eat hot tuna melts (shudder)!

            The lunch room also ALWAYS sold chocolate milk and ice-cream to help save us from complete starvation when the pizza was burnt to a crisp. I do recall one year as being perfect however! Thanks to a very caring teacher who always remembered to give us the lunch menu just before we went home, so it didn’t get shoved into the back of my desk with all the other various elementary school papers. It actually made it home! Once home, I handed it to my mom who immediately taped it up onto my bedroom door. Then every day I knew EXACTLY what was for lunch and whether I needed that extra quarter or not! If it was a really bad lunch menu day (as the hot-tuna-day-chill runs down my spine), I could have my mom make a sandwich for me to bring to school. Then I could buy chocolate milk and an ice cream bar to eat on the playground. God, I was a foodie even back then! I was critiquing the school lunch ladies and talking $%&# of how I could do it better probably.

            The glorious memories of food as a child. I spent much of my childhood, especially summer days, at various friend’s houses. Since we are discussing lunch, I remember my friend Frank’s house well, and one particular lunch I loved. Frank’s mom made me a ham on toast (white bread) with mayo and lettuce. Now you might say, “What is so damn special about that?” Well, I grew up in an Irish household with my mother who used to use butter for everything but when making tuna fish. My mom was a good cook and cared about what we ate very much. SO all my sandwiches were on buttered rolls, buttered bread and buttered toast etc. The whole mayonnaise idea on a sandwich was a NEW concept to me! This was an amazing revelation. To this day, I credit this wonderful woman (Frank’s mom) for introducing me to this marvelous sandwich and to the world of mayonnaise. I still make this sandwich to this day and it brings back warm memories of my childhood and my good friend Frank (AKA Frankie to all of us who knew him way back when). Franks’ mom also made me my first bowl of lentil soup! It is still as clear in my mind as if it happened yesterday. I was sitting at his dining room table, on plastic covered chairs, enjoying my sandwich when she asked: “Russ, do you want some lentil soup to go with your sandwich?”

            I asked: “What’s lentil soup?”

            Frankie said: “You’re lucky if you’ve never had to eat it. It’s gross!”

            Frank’s mom shouted: “Stop that! It’s delicious! Russ, try it, and if you like it, I can give you more, and if you don’t like it you don’t have to finish it.”

            I replied with enthusiasm, “Sure! I’ll try it!”

            I’m sure Frank had said more disparaging remarks that were funny back then, but I can no longer remember all those details. I do remember that I did love that soup and sandwich! I have been eating lentil soup ever since and never fail to thank her for introducing me to those two things.

            So, when it comes to lunchtime foods I consider myself a bit of an expert now. I think back on all the foods I have been asked to try at my friends’ houses. I guess that’s one of the benefits of growing up back when you could walk all over the neighborhood to make friends and just hang out with anyone.

One other such item was introduced to me in my own house, and it was the peanut butter and jelly sandwich. My sister in-law Judy could not believe I had never eaten one and even questioned my mother as to the veracity of my statement. “Peanut and Jelly, ewe” I scowled. My only previous experience with the stuff was in the school cafeteria, in third grade, when one of my friends ate the same thing every day. It was peanut butter and jelly on white bread. It was wrapped in aluminum foil all day and when he opened it up at lunch the jelly had always seeped through the bread enough to make the sandwich look disgusting but he loved it.  He ate that every day no matter what we said about it. Anyhow, Judy gave me one of those sandwiches one summer and I ate peanut butter and jelly sandwiches for about a year after that, before finely tiring of it completely, and have not eaten one since.

            That brings me to today and making sandwiches for lunch. Here on Long Island and in the City of New York we have some of the best and most famous delicatessens in America. They are also probably the most expensive! These delicatessens include: Katz’s, Carnegie’s, Ben’s Kosher Deli, and for me Pastrami and Friends located right here on Long Island.   Shush! Don’t tell people about the last one or it will get too crowded and I will never get in again!

            Since these places are just too crowded or excessively overpriced, I made an art out of making my own sandwiches for lunch. It all starts with the bread. Growing up I had a local bakery by me that was within walking (or bicycle) distance. My mom went there every Saturday morning (she drove her car) and waited in line with a number on a ticket to get things like: hard rolls also called Kaiser Rolls (6 with poppy seeds and 2 unseeded for my sister). She purchased rye bread (one seeded and one unseeded). Then there was the pastries. What she purchased in pastries always changed, but it often included, the black and white cookie, the chocolate sprinkle cookie, maybe an éclair or two, a doughnut or a chocolate twist pretzel!

God, those pretzels were good! These pretzels did not include any traditional pretzel inside but were made strictly of pastry.  They are hard to explain now how they were made but they were very similar to a chocolate cigar only thinner and shaped into a pretzel. Yum! Then as you went through the white paper bags from the bakery was also a couple of apple turnovers or butter cookies or just so much stuff that was all oh so good. The bakeries motto was (if you can believe this) “Everything tastes better with butter.” I have to take a breath now, as I’m getting all choked up. Mom (aka Grams) did this trip every weekend. She did it all fifty-two weekends a year. This was not the only stop in her shopping adventure but usually it was her first stop!

My mother always went to a “special” deli or two. At one deli, she may get all the cold cuts sliced to order and all sliced paper-thin. There was ham, bologna, ham bologna (that Boards Head Brand© no longer makes), salami, corned beef or pastrami and something for herself called Tailor ham. If it was the summer she purchased extra cold cuts like roast beef and turkey as well. Then she was off to the second deli where she would purchase the potato salad, macaroni salad and cold slaw. Next, if need be, was a trip to the super market when we needed more potato chips (both wavy and plain) from Lays© or Wise©.  Charles chips © no longer delivers its classic tin can of potato chips directly to houses. She also came home with a huge selection of condiments like Land of Lakes salted butter, Heinz© ketchup, two or three kinds of mustard (Guldens©, Kosciusko©, Batampte© or some kind of mustard with horse radish in it). When she finally got home Saturday morning from her shopping adventure she went to work wrapped everything up in Handi-Wrap© and Ziploc© bags so it would all stay fresh. My brothers, my sister and I would just be waking up now and beginning to cook. Each making our own special sandwiches for breakfast or lunch that were each unique. On the side of all our plates was always one of the pickles we pick up at a “pickle store”, which we went to once a month and stocked up. The store was called Sterns Pickles. Sadly, since then they have gone out of business. What a shame too, as they were some of the best pickles that I have ever eaten.  

           Now with all that information in mind I think I have had some experience making a wide variety of sandwiches that I would like to impart to you. Even my wife, I don’t believe, has eaten all my sandwich concoctions. She does have her favorites and we will discuss them all starting now. Just like my mom, let’s start with some of our BREADS: White (Wonder bread), Rye (seedless or unseeded), Hard rolls (seedless or unseeded), Hero’s or Italian Bread, Wraps or Flour Tortillas.

            COLD CUTS: Boiled Ham, Turkey, Roast Beef, Pastrami, Corned Beef, Chicken or Buffalo Chicken, Genoa Salami, and maybe Peperoni

            CHEESES: Swiss, Provolone, American cheese, Mozzarella, and/or Munster    

            TOPPINGS: Lettuce, Tomato, Onion, Cold slaw, Pickles or maybe even roasted red peppers or bacon.

            DRESSINGS: Mayo, Mustard, Ketchup, Horseradish sauce, Thousand Island, Barbeque sauce, Ranch, Italian Vinaigrette and even Guacamole.

Here is my short list of sandwiches from the above ingredients:

EASY:

  • White bread Toast: Deli ham, Lettuce, Mayo Served with lentil soup
  • Hard roll, Rye or white bread; Ham, Bologna, Turkey or roast beef; with Swiss, American or Muster cheese; butter, mayo or mustard
  • Roast beef on a Kaiser roll with tomato, onion, mayo salt and pepper
  • Roast beef and turkey on a hero with cold slaw
  • Hot Pastrami or corned beef (micro wave twenty seconds) on rye with mustard
  • Buffalo Chicken on a Tortilla, provolone, (heat in microwave until cheese melts) Add lettuce tomato and ranch dressing
  • Roast beef on a Kaiser roll with Horseradish sauce lettuce and tomato
  • Buttered toasted white bread with Salami

HARDER:

  • Ham on a hero or Italian bread with Swiss and Mustard (heat for 30 second in microwave until hot)
  • Grilled Cheese – White bread and American cheese (ham optional)

Cook until golden brown in 8 inch pan with 1 tablespoon butter. Then flip over add more butter to pan.  Serve with soup.

  • Cuban – Ham, turkey or chicken, provolone, pickles in a wrap and heated up in a sandwich press in a pan with butter, cook on two sides.
  • Pastrami on grilled rye with Swiss, cold slaw, mustard and thousand island dressing. (Follow grilled cheese procedure)
  • The classic Rubin: Corned beef on grilled rye with Swiss, sauerkraut or cold slaw, mustard and thousand island dressing
  • The Italian – Salami, Deli ham (or Cappy ham), peperoni, and provolone and lettuce, tomato, onion, roasted red pepper and vinaigrette on Italian bread
  • Garlic bread (remember that?) – Roast beef, mozzarella cheese, Place under broiler until cheese is good and melted (add beef gravy if you have it!)

These are but a few of the yummy simpler lunch sandwiches. I will have to continue next week with part two: The Weekend Special Sandwiches. I hope this article was not too long. I hope you continue to come back and read my blog. I hope you find it entertaining as well as informative. What’s for my lunch today? If you can believe it its Tuna fish (cold) on white bread with lettuce and mayo. Tuna salad is in next week’s post. Yum.

That’s all for now until tomorrow, Stay Healthy, Be Happy, and Eat Well!

The Drunken Chef (AKA Russ)

© Russ Ahrens and The Magic of a Perfect Pairing,2023

Lesson five: The Brunch Menu Part Two

Eggs Benedict. Yum! Poached eggs are the pinnacle of egg cooking for any chef. The problem is that it’s challenging to make a poached egg that looks like something you would get at a restaurant.

My first tip is that the fresher the egg the better success you will have, as the whites are less “runny” or more viscous when its fresh. When an egg begins to get older, the whites turn more “watery”. Use the freshest eggs you can buy for a better chance at success.

You can make a poached egg and eat it plain, without making it into something else like Eggs Benedict, but why go through ALL that work if a plain egg is all you want? Hell, why not just boil the thing in its shell until it’s soft-boiled and be done with it. Nope, you want to learn how to poach an egg so you can EAT Eggs Benedict or Eggs Florentine.

For eggs benedict, I will suggest starting with toasting the English muffins. I toast mine under the broiler. That leaves one side soft and makes it easier to cut and eat with a fork in the end. Then we need to work on the Hollandaise sauce.  Great sauces are what great chefs strive to achieve. There is a chef’s station in French restaurants called a Saucier. The saucier not only makes all the sauces for the entrées but they can be involved in making stews like Beef Bourguignon, hot hors d’œuvres, and sautéing food to order. Mostly, they are the chefs who make the sauces for the entrées.

This whole sauce making thing is no easy task. Ask anyone who has screwed up the Thanksgiving turkey gravy and never heard the end of it, year, after year, after year. It’s difficult because it can take as many as two days to make some sauces all from scratch. Yet some sauces only take minutes. Hollandaise sauce is called a mother sauce (According to French cooking anyway) and this is one of those sauces that is quick to make. That does not make it easy, just fast to make. Hollandaise can be then used to make “other” sauces by adding, for example, fresh herbs. The sauces made from Hollandaise are called: Béarnaise Sauce, Dijon Sauce, Foyot Sauce, Choron Sauce, & Maltaise Sauce. They are in a class called Emulsified Sauces. I will be writing a whole lesson on just sauces in the coming year as we explore each one of the over two dozen sauces and how they compare to say “Turkey Gravy.” Yes, that is a sauce! It’s not “Frenchie” but it’s a sauce. There are five mother sauces in all, and each one has other sauces that are made from it. To explain it all now I would have to get out my charts and graphs. It’s a whole big science lesson thing and it is best saved for another day or a future YouTube show.

Let’s get back to today’s feature article. Pull out our medium sized saucepot, for poaching the eggs. I use a 1.5-quart size pot filled with 1-quart of cold tap water. Add two teaspoons of white vinegar and one tablespoon kosher salt (2½ teaspoons of table salt). The salt and vinegar are not for taste but rather to help the poached egg to form while it cooks quicker and to help produce a better-looking poached egg. Start by bringing the water and stuff to a boil so we can add the eggs later.

Now let’s make that sauce!


Hollandaise Sauce

To make 2 cups of Hollandaise Sauce, you will need:

  • 1 1/4 lbs. of butter (5 sticks), clarified* (you should end up with about 1 lb. of clarified butter)
  • 1/8 teaspoon Salt, (kosher preferred so less if its table salt)
  • 2 Tablespoons White Wine Vinegar
  • 2 Tablespoons cold water
  • 6 Egg Yolks **
  • 1-2 Tablespoons of lemon juice
  • Salt, white pepper and Cayenne Pepper or Hot sauce to taste

DIRECTIONS:

  • Clarify your butter*. (this already makes this complicated)
  • Place salt, vinegar and crushed peppercorns into a saucepan and reduce by 2/3. Remove from heat and add water.
  • Transfer reduction to a stainless-steel mixing bowl.
  • Add egg yolks** and beat over a simmering pot of water until the egg yolks become thick and creamy. (If unsure about the thickness, monitor with an instant read thermometer and make sure the eggs do not exceed 150°F/65°C).
  • Once the egg yolks have reached the desired thickness, remove from heat. Slowly drizzle in the warm clarified butter into the yoks while beating with a wire whisk, starting with just a few droplets at first to get the emulsion going.
  • Continue streaming in the clarified butter until it is completely incorporated. If the hollandaise becomes too thick before all the butter is emulsified in, thin the hollandaise with a couple drops of warm water.
  • Finish by seasoning your hollandaise with salt, lemon juice and cayenne pepper to taste. Add just enough cayenne to help cut through the fat of the hollandaise and to add depth of flavor; your hollandaise should NOT be spicy.
  • You can adjust final consistency by adding a little bit of warm water to both lighten the sauce and give it a better flow.
  • The Hollandaise should be kept warm over a double boiler until ready to serve. The best holding temperature is about 145°F/63°C. This temperature both discourages the growth of bacteria and is hot enough to keep the fat in your hollandaise from solidifying. For both food safety and quality control, hollandaise should not be held at this temp any longer than two hours.
  • Common Secondary Sauces: Bearnaise, Maltaise, Mousseline, Foyot, Choron.

Classically Served With: Eggs (Eggs Benedict), Vegetables (especially Asparagus), light poultry dishes, fish, and Beef (as a Bernaise Sauce).

Holy cow that was a lot of work for just two cups of this stuff but it’s so good! Now if you are not into trying to prove yourself as a top chef and still want to try your hand a poaching eggs or making eggs benedict, I have a suggestion. Shush, don’t tell anyone, but it is called Knorr’s Hollandaise sauce. I use it when I’m being lazy, which means I always keep it in my spice cabinet and use it before it expires! Now you can concentrate on those eggs!

Now let’s make some eggs and heat up some ham. In a small pan add butter and fry up some deli ham or Canadian bacon as it is traditional. As the water comes to a boil begin to crack your room temperature eggs into Pyrex dishes.  I find when starting out it makes sliding the eggs into the water easier. Pro Tip: Stir the water so it spinning around slowly, slide the egg right into the center and watch it drop to the bottom. Add the next egg and so on up to 6 eggs. As the eggs rise up and come to the surface they are almost done. Professional chefs remove them now and place them in water that is a perfect 150 degrees to “cook through and to kill any salmonella.” I myself let them float on the water just a bit longer, perhaps only a minute or two before placing them on my already toasted English muffin. It’s time to assemble said Eggs Benedict, place a slice of ham or Canadian bacon on one half of an English muffin. Is any of this American? Next put the eggs on the ham. Why do we do it in that order? Answer: The ham stops the English muffin from getting way too mushy. Now, (wait for it) pour over your Hollandaise sauce. YUM! Serve immediately with a Bellini or Mimosa! I will have to try it with a Bloody Mary next time.

This whole dish can be changed up very easily to a second recipe called: Eggs Florentine. This is simply done by swapping out the ham for some cooked and well drained spinach. I have used asparagus too but I don’t know what that’s called. Left over lobster meat on top is also wonderful but who ever has leftovers from lobster?

How to Clarify Butter* or make “Drawn Butter”:

Clarified butter, (my mother always called this drawn butter), is unsalted butter that is melted down and allowed to separate out over very low heat so that the proteins that are milk solids can be removed. After the clarification process, the butter now has a higher smoke point and makes it great for cooking or frying in. I will explain why shortly.

The easiest way to clarify butter is over a water bath or double boiler. This allows you to gently heat the butter just to the boiling point of water or 212 degrees and will never get any hotter! At this temperature, the water literally bubbles up and out of the butter as it evaporates. What’s left is the whey proteins that form a white foam on top. Eventually the foam will dehydrate as well and collapse as it cooks, leaving you with a thin skin of whey protein on top. Some of the dry casein particles now sink to the bottom. If you did not use a double boiler for this process, they would eventually start to brown. We did, so we are safe to finish the process. Simply skim off the “skin” using a ladle or large spoon. Then pour off the clarified butter, being careful not to include any of the white casein particles that have settled to the bottom. Ka-Pow – Clarified butter! Clarified butter can keep in the fridge up to one year! So you can definitely make this ahead of time for any dish. I have a whole mason jar of this liquid gold in my fridge.

What happens if you do not use a double boiler? Then you run the risk of browning those milk proteins on the bottom of the pot. In that case you have now made something called “Ghee”. Ghee is a clarified butter made using almost the identical technique as above, but is cooked in a pot instead of a double boiler. Because the milk solids come into direct contact with heat from the burner, they can get to higher temperatures than 212°F. It is at this point they start to brown. If you continue browning the milk fats (slowly) then the finished Ghee will have a dark brown color and a nutty aroma. This is very good for other recipes but it is not what we are looking to use in our Hollandaise Sauce. I love science and there is a LOT of it in cooking but no one tells you about it. No one except, Alton Brown and Harold McGee (listed alphabetically). These are just two of my favorite cookbook authors. Enough science for today, go enjoy your breakfast.

I think it’s time to take a break from breakfast so next time maybe we will do a lunch dish. Thanks for reading today and until next time; Stay Healthy, Be Happy, and Eat well!  

** Separating eggs: The old-fashioned way of separating eggs is by transferring the yoke back and forth between the half shells over one bowl. Then moving each item to its own bowl so as not to contaminate the eleven prior separated eggs with a broken yoke on the twelfth try. The second method also involves three bowls. One bowl holds up a slotted spoon or strainer. Crack the egg onto the slotted spoon and then move the yoke to its own bowl. Then move the white into its own separate bowl. Repeat this process until you have enough yokes or whites for what you need. Extra egg whites can be frozen for future use. Mixed eggs (whites with broken yokes) can be used for making omelets.

Until tomorrow, be happy, stay healthy and eat well.

The Drunken Chef (AKA Russ)

© Russ Ahrens and The Magic of a Perfect Pairing,2023

PS – You can also add to you menu the following:

FRENCH TOAST

Pasta, Pink Sauce and Garlic Bread

May 12, 2021

            The dishes are done. Lunch is made (for Jennifer) and the coffee is percolating, so it won’t be long until I feel more awake.

            I cooked last night. I know, I can’t believe it either but I did. Well, I sort of cooked. The sauce was leftover homemade meat sauce that I froze a month or so ago. The pasta I choose was De Cecco Shells. I had purchased them on sale after a coworker had recommended De Cecco pasta. Thanks Pete, they were delicious and I will be buying more De Cecco pasta the next time I see it on sale!

            I put up a big pot of water to boil. I added salt and a bit of olive oil. My mom always added oil to the pot of water. She said it kept the pasta from sticking. I don’t know about that but its tradition.  My wife would not want her haunting us just because I didn’t put oil in the pasta water, I’m sure.  Personally, I wouldn’t mind a visit once every blue moon.

            I defrosted the sauce in the microwave. Yes, I own one! Sheesh, I don’t make everything from scratch. Jennifer uses it to reheat pizza in, although not for breakfast. For breakfast, my wife will just eat the pizza cold. Ew! I still have to heat the pizza stone up for that, but I digress.

            I added the quart of now defrosted sauce (see how fast that microwave is) to a medium size pot. Next, I heated it up on medium high and stirred it so I didn’t burn the bottom.

            By the time the sauce was warm and at a simmer the pasta water was boiling. I did the next logical step, and added the pasta to the WATER and gave it a stir. Then I set the timer. Please don’t overcook your pasta. It gets mushy. Usually the manufacture recommends a three-minute range. I boil it to where it’s right in the middle of that range unless I’m making Ziti but that’s a different recipe.

Let’s get back to that sauce. When it started to bubble, I turned the heat down to low and added the butter. I used 5 tablespoons of butter and as soon as it was melted, I turned off the heat. I grated ½ cup of some fresh parmesan cheese using a cheese grater with medium size holes.

I moved to the garlic bread. I sliced open the loaf using a bread knife cutting the bread long ways and buttered it. The bread was frozen and recently defrosted from French night. (You read about French night, right? It was fun. You should check out that article and let me know what you think.) For speed and efficiency and because the pasta was almost done and I was hungry and I wanted to eat soon so I sprinkled garlic powder onto the buttered French bread. This is my way of quickly and easily making garlic bread. This was not how I was taught to make garlic bread in school but I will do that recipe another time. Remind me, if I forget.  The buttered and garlicky bread then went under the broiler. Keep your eye on it. I have burnt a few loaves of bread in my day. Smoke alarms go off, there are people waving towels in the air. Doors get opened and people are screaming. It’s not pretty.

I look up at the pasta timer. Crap! The pasta is almost done! Quick, back to the sauce, I added the parmesan cheese and stirred. Lastly, I added just enough heavy cream (again left from French night) to make it pinkish as I stirred.

No sooner than I finished stirring, did the timer going off, saying, “Breads done!” I remove it without burning it or myself. Now the pasta timers going off! Luckily, somewhere in there I put my favorite collider in the sink and drained the pasta. I give it a few shakes to get the water out of all the shells and begin to plate it all up. Whew! Dinner is served! If you want, try sprinkling the pasta with some crushed red pepper and topping with more parmesan cheese its yummy. Serve this dish with a nice red wine (specifically a Chianti) or cold Peroni beer. I had neither, as last night was a Scout meeting. See I don’t drink every night.

Normally, I would say “That’s all for today and I’m off to work”, but I took the day off. I need to put together my brand new barbeque grill! I received it as a gift for my birthday/anniversary/father’s day. I’m excited to start grilling and barbequing and mansplaining the difference with a beer in one hand and maybe a cigar in the other!

See you tomorrow and until then: Be safe, be happy and EAT WELL!

The Drunken Chef (Russ)

May 12, 2021

© Russ Ahrens and The Magic of a Perfect Pairing,2021

Black Beans and Chicken Burritos

May 11, 2021

            It’s early in the morning and I only have a few minutes to myself so I folded the laundry. Then I made Jennifer lunch (just a boring sandwich) and now the coffee is finally ready. Last night was boring too, in terms of gourmet meals. I was not feeling very inspired for a Monday night.

            I decided on chicken burritos and black beans. Normally I would even have some kind of rice with this dish but lately Jennifer is tired of rice. So I eighty sixed the rice idea.

            I stared by cubing the chicken and sautéing it but I won’t go into all the details this morning as this is a short article written before I leave for work. I pretty sure, I have made chicken Burritos before for this Drunken Chef cookbook project and don’t need to repeat things.  This post is a simple one, I really to have to going and get to work! Long Island traffic can be… a bit troublesome.

This post is about last night’s side dish of black beans that both Sam and Jennifer love.

BLACK BEANS recipe:

INGREDIENTS:

1 can of black beans

½ yellow onion diced

1 glove garlic minced

1 tablespoon olive oil

DIRECTIONS:

Rinse and drain the black beans under cold water. I use a medium sized strainer for this step. While the beans are draining (balancing the strainer on the empty can). Chop one onion and mince your garlic using a chefs knife and cutting board. Add one tablespoon of olive oil to a small pot with a lid. Don’t put the lid on yet! Heat the olive oil over medium heat and add the onion. Simmer one minute or until translucent then add the garlic and stir. Please do not let the garlic burn. The beans will then taste gross. Gross; in this case is a technical term meaning disgusting and it is not to be confused with the numerical value of 144. Now add your beans to the pot with onion and garlic then stir. Cover and turn down the heat down to low.

By the time your chicken is cooked, the beans will be ready. Do you remember I started cooking the chicken at the beginning of all this or is your brain as fuzzy as mind at 6:00am?

Now you can add the beans to the burritos just like I did or serve them on the side with Spanish style rice (recipe to come when I have more time). No vegetables again yikes! Unless you count the beans but black beans are really like another protein aren’t they?!

Well yay me as I’m off to sit in traffic on my way to work.

Until next time. Stay healthy, be happy and eat well!

The Drunken Chef (Russ)

May 11, 2021

© Russ Ahrens and The Magic of a Perfect Pairing,2021

Lesson five: The Brunch Menu Part One

Ah Sunday! I love Sunday…even though it’s Monday. We can still reminisce about Sunday! The one day I get to sleep in an extra hour or two! Sundays remind me of my childhood. When I was a kid the newspaper was delivered every day and on Sunday there was that big fat paper with all those great comics and a magazine. Back then, Sunday was the only day the comics were in color. If it were Easter Sunday that meant I had a fresh new batch of Silly Putty too! You could press the Silly Putty to the newsprint and when you peeled it off you would have a color comic on it. I don’t know why that amused me back then but it kept me busy for a bit. At least until breakfast was ready. Did you know that the silly putty trick does not work anymore? They changed the ink or something. Speaking of Easter Sunday, it felt like it was so early this year. It feels like I missed it somehow. It is only now that it is getting warmer outside. Last night, it was even unusually cold for this time of year. My heat even started coming on and it ran all night! The home heating oil god hates me apparently and wants me to burn as much of the stuff as he can produce before having to turn on the air-conditioners before summer hits. Wow! Where did that rant come from? It is Sunday, so let’s chill out with a big Sunday morning breakfast!

We have made pancakes, eggs, and omelets. What’s next? Mmm. Let’s begin by making some coffee, then a frittata. A frittata is only really a giant omelet, but it comes from the oven!

We will need a 9 inch by 13-inch glass Pyrex baking dish and a pan to make the bacon and or sausage in.

We will also need:

INGREDIENTS:

12 Eggs

1 TBLS. Milk

Hash browns or potato tots (defrosted)

One-pound cook Bacon (crumbled)

One package of breakfast sausage (Cubed)

8 ounces shredded cheddar cheese (one package)

1 Tablespoon Vegetable oil

A few drops of Tabasco (To taste)

DIRECTIONS:

Preheat the oven to 350 degrees. Grease the bottom of your Pyrex baking dish with a little cooking spray or just a bit of canola oil or vegetable oil. Olive oil can be a little heavy tasting but if it’s all you have. Use a paper towel to swoosh the cooking oil around. You don’t need to swoosh the spray stuff. I am not really a fan of the spray stuff because I don’t know what’s in it. I own it. I use it on occasion, but I don’t like it when I do. Yet, easy is sometimes best! Now that the bottom has a nice thin nonstick coating lets add those store-bought home fries or tater tots. Why do I use these instead of making my own fresh? Mainly because I’m not masochistic. I could make them fresh sure but why do that today? Okay, here’s how.

Let’s peel and grate two or three large baking potatoes. Then get a large pan nice and hot. Add two tablespoons of vegetable oil or peanut oil (If you not allergic to peanuts, otherwise I guess use the vegetable oil). Now fry the potato up in the hot oil until it’s a nice golden brown on both sides. Drain the potatoes and cool them off. Now you can add them to the bottom of the pan. Most times, I use the ones I get from the frozen food section that look just like those hash browns from McDonalds. They work great once they are defrosted. I press them into the pan making sure they are placed next to each other and they are flat against the bottom. Then I pop the Pyrex dish and the potatoes into the oven for a few minutes. Check on them every five minutes. Take them out as soon as they start to get slightly brown and crisp up or begin to sizzle. In the meantime, while the potatoes cook, let’s make the bacon. If you have never made bacon before it takes practice to get it just right. Just don’t let your bacon burn or it will ruin your whole frittata. It is best to leave bacon out if it burns at all.  When done it should be a light golden brown so that it crumbles nicely. Please wait until its cool before crumbling. Otherwise you will need one of those Scouts I have mentioned in a previous post to preform first aid for the burns on your hands. See the how to make bacon lesson next.

Okay! Nice job on the bacon by the by! Now you can cook up all of those breakfast sausages in some of that bacon grease. I defrost it if its frozen, then I slice it. It is easier to slice cold sausages then hot ones. Do other cookbooks point these things out?

Have you been checking on your potatoes? If not, then they are plenty brown by now. Sprinkle the cooked sausage and the bacon across the potatoes spreading them across the whole dish evenly.

Now it’s time to break a few eggs into a large bowl. You can’t have a frittata without breaking a few eggs. Add a tablespoon of milk to the bowl with the eggs. Too much milk and the eggs won’t set. You can even add some Tabasco now. I like this stuff so I always add a little. Because we are using a dozen eggs, I would add about ten drops or five good shakes of the bottle. That is not even one-drop per egg. Most people don’t even notice the Tabasco if you don’t add too much! Next, scramble the dozen eggs using a wire whisk or fork from your flatware set. Do not add the cheese yet! This the same thing as adding too much milk. The eggs will not cook. You will have a cheesy custard casserole, ewe. Now pour the scrambled eggs into the pan filling it up ¾ of the way. Do not fill it to the top or it will spill over before it finishes cooking. Place the eggs in the oven. I hope you didn’t turn the oven off after taking out the potatoes. Bake for about 20 minutes. Check it after twenty minutes to see if it’s just set. If it is not done yet, then check on it every ten minutes after that until its set. Then sprinkle all that nice cheddar cheese on top! If you’re really a pro you grated a block of cheddar yourself. You saved money and hopefully your fingers too! Then place it back in the oven until it is all melty and yummy. Let it rest for only a few minutes and serve with fresh bagels, English muffins or toast. Add orange juice, tomato juice or pineapple juice. Add mimosas or Bellini’s or Bloody Mary’s if your home with friends and enjoy!

This recipe works in a cast iron Dutch oven as well. This will work if your ever stuck in the woods and need a good hearty breakfast meal in a hurry. To make it in a hurry you can precook the sausage and the bacon before the trip and bring it with you in a cooler with ice. You can even cook the bacon and sausage the night before while making dinner! Then just put it all in the cooler for the next morning. Dutch oven or Cast-Iron Pot cooking is a whole few separate lessons in themselves. In addition, you do not need water to clean a Dutch oven only coarse salt, oil and a $#@& load of paper towels! I will save that tip for the Scouts!

Next time we will cover poached eggs and Hollandaise Sauce for my favorite, Eggs Benedict. That’s all in our next Lesson…

Until tomorrow, stay awake, be happy and eat well.

The Drunken Chef (AKA Russ)

© Russ Ahrens and The Magic of a Perfect Pairing,2023


French Friday

As I sit at my kitchen table on a early Saturday morning, (my basement office is still unfinished) and write this article, I am still surrounded by just over two dozen empty and partially filled wine glasses. My dining room looks as if Snoop Dogg and Martha Stewart did one of their TV shows here about Julia Child’s cooking and left me the mess to clean up! I even did a weak impression of Julia last night just as the wine was opened. *In a Julia Child voice* “And finally, the drinking can begin. Bon Appetit!” At lease the coffee is done and sitting next to me as well as TWO loads if dishes and there is still more to go. If all the prep work involved in French cooking does not scare you away, all the damn dishes should! Thank god for my Whirlpool Dishwasher!

 I will stick with American cooking for a while after this. Maybe, even recipes without cream and butter. Well, maybe just a bit of butter… Let me state also that today’s Sunday posting has none of the recipes from either of my two books. Nope, not one, but it was a marvelous evening of food, friends and wine that enhanced it all.

Sam and I worked on the menu. It was mostly Sam’s suggestions that went into the final menu. I only really wanted to make one dish for last night and that was Beef Wellington. I found out far too late that Beef Wellington is English and decidedly not French. Who knew?! I will return to that issue later.

Our friends showed up right on time, as we were just finishing any last minute prep work. Scott brought with him all the wine for a long evening of drunken debauchery. He was carrying what looked like a very large brown leather suitcase that one would bring to an airport for a long trip.

I said, “Quick, honey, turn off all the lights and be quiet it looks like they are moving in.” I thought I was being funny but no one laughed.

The suitcase, which Scott was carrying, contained serval bottles of wine. Holy cow that was a lot of wine! It was like watching Marry Poppins with her carpetbag as he pulled bottles out of his suitcase and placed it on my counter.

There were five white wines, two reds and one desert wine. That was more wine then there were courses we prepared to serve.

The first course was Julia’s a Fromage e Atelier Fondue that Sam made using a Pinot Grigio by Clos du Bios. Scott paired it with an Italian white wine, Gabriella Pinot Grigio, and a French Pinot Grit. It was the first time using Sam’s new Fondue pot. I set up the pot, grated the cheese, and Sam put it all together. The recipes he “adopted” form Julia’s book. He just left out the seafood, otherwise he kept the cheese, spices and wine consistent. Next was a canapés that Sam’s very talented classically trained French chef cousin, Josie, designed. Who, by the way, should come visit us! She tends to cook Fusion dishes and they are delicious! The canapés were incredible. Scott paired these with a Viognier from Rhone and the Crozes-Hermitage. We now had four half glasses or wine in front of us.

Following the canapés, we had Cornish hens that again came from Julia’s cookbook. The hens were stuffed with a plethora herbs. As they cooked we began basting them with heavy cream. To serve, they were cut in half and Sam coated them with an herb cream sauce that included a bit of lemon juice. They were spectacular (I had never had cornish hens before), especially when paired with one more white wine. Next, was a salad and not just any old salad but some kind of French greens concoction that had eschellets (marinated shallots) on top and it was scrumptious. The salad consisted of mustard greens, romaine lettuce, flat leaf parsley, tarragon, and chives. We even tried one of the red wines with it all while going BACK to the white wines and trying them too. So overall we had six glasses of wine now in front of us. No time to rest on our Loral’s. My beef course was next the beef wellington and peeled asparagus with hollandaise sauce.

I had never made beef wellington and Sam had never made any of the previous dishes. I made two big mistakes: The first was with the dough I purchased at my very local the grocery store. It was phyllo dough and that was a mistake. I should have known better too having worked with it before. As soon as I opened it and saw what it was I said oh $#@&! It was supposed to be a puff pastry. That’s more like a pie crust then phyllo dough. The phyllo dough was too flaky.  The second I didn’t think this dish went at all with the other previous dishes but everyone ate it all saying it was delicious. I was disappointed in myself for not realizing that beef wellington was an English dish. It just did not go with the meal I thought. Another course meant another French red wine. The wine that Scott picked out for the beef dish was perfect of course. Truth be told, after eating the beef I could have used more of the asparagus as it was extraordinary with the wine or perhaps my body is just craving more vegetables!

We did rest on the couch for a bit after the beef but not very long. We all needed to digest and make room for desert. We sat, we talked and we sipped one of our favorite wines from the eight now on the table as we waited for Alysa to return from buying Girl Scout cookies from someone.

 Crème Brule was for the first dessert. This is where Sam’s got to use the brand new kitchen torch we got him for Christmas. Additionally he prepared a Chocolate mousse he just whipped up and the last minutes out of the rest of the heavy cream and some semisweet chocolate morsels. Two deserts… I looked around to make sure I was not on some kind of cruise ship. I usually never eat dessert much less have two in front of me. I came to the realization that I was still in my own dinning room and there would be no waiter or staff either to take care of the dishes. Of course, Scoot had brought a desert wine to go with it! I think it this was my favorite wine of the night. I’m not sure if it was because it was the last wine or just because it was just so damn good. The history lesson on the wine from Scott was pretty cool too. The desert wine was a Clos du Bois, Sonoma Reserve, Knights Valley, FLEUR. It was a late harvest Semillion. Apparently, Semillion wines date back to the time when Napoleon ruled France and he classified the original four vineyards as “First Growth” wines.

After diner, it was late, and time for our friends to return home with a small amount of the leftover beef for their wonderful and huge German shepherds. Jennifer and I both love how good and playful they both are with us whenever we are there.

In the end I think even Snoop Dogg and Martha would have loved it. It was certainly well worth all the dirty dishes I had to run through the dishwasher then put away. At least until next time, in some not too distant future, when we will use them all again for another fabulous meal with friends!

Well that is all I have to say this for week. See you again next week and until then. Stay healthy, be happy and eat well.

The Drunken Chef

How TO Cook: Food safety

Now that we are working with raw eggs, making omelets and had our coffee I can bore you with a chat about food Safety. We are lucky enough in the United States to have probably over a dozen different agencies that are involved with protecting the safety and healthiness of food from the farm tot the table. These include but are certainly not limited to the USDA and FDA that help to enforce various rules and regulations that help insure a safe product on grocery store shelves or served restaurants. 

Why should the home cook be concerned then? Because there are still things that happen in nature naturally that are out of there control. Following proper procedures or guidelines when cooking help to keep your family and friends safe from getting a nasty stomach bug. Eww.  

Most bacterial contamination can be prevented with the proper care, handling and storage of fresh food. That big appliance in your kitchen that takes up SO much room is the refrigerator/freezer. To my surprise and dismay, it is not just there just to keep my beer cold (I really need to get myself a Kegerator for that)! In the United States we probably own the biggest refrigerators/freezers in the entire world. Why? Because we only go grocery shopping once a week or once a month if it’s a Cosco run. Therefore, we need someplace to keep all that fresh Dairy, Meat and Produce fresh and safe to eat!

Because bacteria grow and a much quicker rate the warmer it gets (usually between 40°F and 140°F) it’s a good idea to store our food in these chilly devices and keep the refrigerator at a temperature at between below 40° F (4° C) and 33° F 1° C). The freezer temperature should be set 0° F (-18° C). (Insert the picture of thermometer here)

There is some bacteria that are good. They help ferment wheat and barley into beer or grapes into wine. Cheese would not be cheese without it. Some bacteria are what make food spoil and smell bad.

Hand washing – Bacteria can be spread throughout the kitchen and get onto hands, cutting boards, utensils, counter tops and food. Cross-contamination is how bacteria can be spread from raw meat to raw vegetables. Always start with a clean surface. Wash your hands with warm soapy water and rinse and dry well. Wash cutting boards, dishes, countertops and utensils with hot soapy water. Restaurants often have their water temperature tested by regular inspections by the local health department to make sure it is hot enough to kill bacteria.

Wash your hands after handling any raw beef, poultry, fish or even eggs.

Wash you counters, cutting boards and knives after cutting any raw beef, poultry, fish.

I even clean my sponge in hot soapy water and then place it in the dishwasher with the dishes about three tiems a week. I also two use separate sponges. One is for dishes and the second is for counters tops and tables. I always prevent cross contamination by using a clean cutting board between preparing meat and vegetables.

All vegetables like potatoes and those green bell peppers we used for our omelet always need to be washed under cold water.        

Defrost frozen food in the refrigerator, in cold water, or in the microwave.

Keep hot food hot and cold foods cold! Do not let cooked items sit on the counter until they are cold and then serve them. Hot foods should never drop below 140 degrees before putting in refrigeration. 

Cold foods needs to keep cold just before serving. Do not leave potato salad out in the hot summer sun for 2 hours and then think you can eat it. You will not be going to work or school the next day. Food poisoning not only sucks because it hurts but it can be deadly if not taken seriously! Perishable foods should be brought home and placed in their proper locations in the refrigerator immediately. If you are shopping at multiple stores and your trip maybe longer than 30 minutes or it’s warm sunny day, bring a freezer bag or cooler with freezer packs to cold items until you get home. If your camping make sure, you have a cooler with plenty of ice and things are package appropriately so things like chop meat do not contaminate the lettuce and cheese you are using to make tacos!

For safe picnics and camping trips. Wash all thermal containers with hot soapy and rise well with hot water. You can wash all your vegetables even before packing them.

Use one cooler for food and a separate cooler for beverages. The beverage/beer cooler maybe be opened quiet often on a hot summer day. Place all raw meat in tightly wrapped in zip top bags to prevent them from dripping and contaminating other foods.

Remember to take your instant read food thermometer with you. That’s why you see all the chef’s with that round thermometer sticking out of their pocket. Its there for them to use and keep you healthy and safe. Not just because you want your steak medium rare. 

Lesson Three – Breakfast: Omelet or OMELETTE?

Now with eggs under our belt we should talk about Omelets and how to make them, by the way which is correct? Omelet or Omelette? I can tell you that Microsoft Word does not like the French spelling and that figures, since it uses an American English dictionary to correct spelling errors. Since I am teaching an American Style cooking here (at least I’m trying too), I think we will stick with the American spelling too – Omelet. Isn’t the English language hard enough WITHOUT multiple ways to spell the same F#$%^&@ word! UGH! Can I also say that as an amateur writer how I think, speak and write are three different things! For starters, I could never write down everything I think. I would possibly receive a lot more hate mail. So therefore, I bite my tongue as it were when it comes to my opinion on politics sometimes. Besides you are all here to cook and have fun. Not to listen to my political or religious views here. It is also tougher for me to write stuff because I can’t write the same way as I would casually talk to my friends because it would be too difficult to read. Once again, I blame this stupid language for not making things simple. Come on people, it’s the 21st Century! Can’t we make things easier to read, write or speak to each other? Maybe, that’s half the problem with governments. They have to write everything down, then two hundred years later they argue over it because someone thinks it means something different NOW! Okay done ranting. Let’s cook. You can find the recipe here: Omelet Recipe

So you’re ready to step up too one of my all-time favorite breakfast foods: The Omelet! If you want to put more than just cheese in it then that means learning how to do some slicing, dicing, and chopping. As I look around for my YouTube production crew it seems they have all left…or are still nonexistent.  That means I will be writhing this it all out. Maybe later I can read it from the teleprompter as I record this lesson on my cell phone (me laughing to myself).

Let’s start by learning how to do some slicing. Round things like potatoes and onions should first be cut in half. Wait! Wait! Not yet…Lets peel that potato with a vegetable peeler first. Peel the skin off AWAY from your body and make sure your other hand has a firm grip on that slippery potato. Make sure too your hand holding said potato is also out of harm’s way. Vegetable peelers, when new will be sharp and that’s good. The older it is the more dull it will become and the more difficult it will be to use. Work your way around the potato making sure to slice off the entire outer layer. You can use a paring knife to carefully remove the deeper eyes of the potato or deep gouges. Now you can wash that slippery sucker. Some people wash it before they peel it but I say: “Six of one, half a dozen of another.” I wash it after peeling it.

For an onion, you need to peel the outer layers off by hand. If you want to dice or mince the onion then begin by placing it down on your cutting board. Hold it firmly with your non-dominate hand (that is the hand opposite of the one that is now holding the sharp knife). Cut off the top of the onion (the opposite side of the root end). Now turn the onion so that the flat surface is on the cutting board. Slice the darn thing in half. Now you can easily peel off those brown layers of tough to chew skin.

Perfect! Now place the halved onion back of the cutting board with the large flat side facing down. Then cut off the root end.  From here, you can slice it up. Working your cuts (slices) from the tip to the root end. Wha-lah! You have a sliced onion! To dice it, cut the onion into strips but not all the way across, and only go as far back as half way. This leaves the root end intact. Now turn the onion 90 degrees (that’s a quarter of a turn). Then, just like you did before cut slices across the onion so it will now form small square-like shapes as it falls away. If you want minced onion, just make your cuts all closer together. Too really mince it, put a chopped onion on the cutting board and use your brand new ZYLISS Zick-Zick classic food chopper! Then presto! One perfectly minced onion! I also have a nifty little onion holder that looks like a fork like thingy to hold the onion in place, but I never use it myself. My mother loved it because of the arthritis in her fingers made it difficult for her to hold an onion.

The potato is next and should be first cut in half, then each half into thirds then turn all three pieces together 90 degrees and cut it four more times. *Poof* Diced potatoes.

How about pre-sliced deli ham? Roll up three slices of ham. For thicker cuts of deli ham or corned beef say 1/4 inch thick lay it flat. Slice them all the long way into strips or Julian. Then turn it and cut it into cubes or diced ham or corn beef!

Green bell peppers. OH boy! For this, there are more YouTube videos then Carters has pills! Cut off the top. Then Slice right down the middle. Clean out the seeds and the white pithy bitter membrane. Slice into strips AKA Julienne. Turn and then cut those into dice.

So let’s see we have two large or jumbo eggs, diced green bell peppers, diced onion, diced ham and even diced potatoes. That sounds like a fine western omelet (with potatoes).

Start by cooking the potatoes first in a small 9.5 inch Gotham copper non-stick pan with a tablespoon of oil over medium heat. When they start to brown, add the onion, green bell pepper, ham and cook for two or three more minutes over medium heat. While that cook’s scramble two large eggs that you have added a tablespoon of milk too. You can also add black ground pepper and three drops of tabasco, should you desire. Now add a tablespoon of butter to the pan. Wait until that butter is all melted and it starts to sizzle. Then pour the scrambled eggs into the pan and cover it with all those yummy vegetables and the ham. Turn down the heat to low and cook covered until the top is almost firm.

“Now comes the tricky part” as I hear Julia Child’s voice in my head, “flipping the omelet”. First time flippers should use their brand-new and wonderful “pancake turner” that they just purchased from Amazon and received the next day. I have managed to learn (over too many years of trying) how to flip my omelets in mid air. Please do not practice that with your first-time omelets but you can start practicing that trick later on with one of your fried eggs (if you dare) and only if you don’t want that egg over easy with an unbroken yoke. Pro tip: if you not practiced at it the yoke may break when it slams against the pan.

There you go, one western omelet done to perfection. Much simpler to make is the plain cheese omelet.  Preheat your non-stick pan with a tablespoon of butter. When the butter starts to sizzle and bubble the pan is hot and the butter is ready to cook in. Pour in your newly scrambled eggs and cover that puppy up. Let that cook on low until the top is firm. Add the cheese onto half of the omelet. The cheese selection is your choice. I like Kraft Deluxe American cheese for this. Why, because it is real American cheese not some processed cheese “product”. That’s why it costs more than the crappy fake cheese.  Cook covered over low heat for one or two more minutes. Then fold your omelet in half and remove it to a plate. Add buttered toast, orange juice and serve. Don’t forget about the coffee that is posted next in lesson four. See we need coffee!

Other stuffed omelets are made the same way. Once the top is firm, add mushrooms and Swiss and cover or add broccoli and cheddar or salsa and Monterey jack or Spinach and Gruyère. You get the idea. 

Did I mention the coffee, don’t forget the coffee…

Omelets are a great way to start to experiment with flavors and cooking! A good tip would be to blanch or steam your vegetables like broccoli but not spinach in advance. This is also a great way to use MANY leftovers like corned beef. These are also great for lunch or a light dinner!

To blanch something place it into boiling water for a few minutes then plunge it into ice water to stop the cooking process.

Boil vs Simmering – Water at a boil will produce many bubbles that will rise up and beak the surface. Simmering will only show small bubbles on the pots bottom.

Now you’re cooking!

Until tomorrow, be happy, stay healthy and eat well.

The Drunken Chef (AKA Russ)

© Russ Ahrens and The Magic of a Perfect Pairing,2023

Lesson four: Coffee

Before I start today’s, recipe let me just say that last night I did not cook, yet again. Our friend Scott made a delicious pot of chili and invited us over for Chili and “Dawgs” (that’s what we call um in New York City or is it Long Guy-land?) Well, enough of my terrible accent for now, the chili was delicious and I even had mine with cheddar cheese and sour cream on top. Plus, I had one hot dog (sans bun) and only one glass of a marvelous merlot. Yes, just one. I know that is strange for me but I have not been feeling very well. It seems I am always feeling exhausted lately but I’m heading to see the doctor and should be right as rain soon. I posted pictures of the wine and the chili at the end, although it should be coffee I suppose.

Well anyhow, good morning and now back to our recipe! Today is all about coffee. At least I think it’s good morning. I have either not been sleeping well lately or not feeling well. I have finally decided to make a doctor appointment over this whole extreme tiredness thing that’s happening to me. It’s very frustrating to want to do things and not have the strength or the energy to do even simple things like mow the lawn. All I want to do is laydown and rest but when I do, I cannot sleep. It seems crazy! Hence, I’m glad the coffee I made is almost ready.

So for most of you, I bet this is not a recipe. Much like beer that comes from a bottle or a can you may get your coffee from a pod or the local 7 Eleven convenience store. Now don’t get me wrong because I can’t tell you how many cups of coffee I have purchased from the aforementioned 7 Eleven or what is the name of those places on all the interstate highways – Stewarts, Speedway, Wegmans, nope? OH yes their called Wawa!?? Maybe I just love saying it in the car! Well whatever the place is the coffee is usually good unless it is like 7pm and you are on your way to night school and stop at McDonalds in like the year 2000. Then yuck! That coffee from McDonalds was one of the worst cups of coffee I have ever had to endure in my life. Why did I drink it? It was a Social Studies class after working all day and the professor read from the dam book all class long. It didn’t get much more boring for me than that. So to stay awake and still be able to drive home at 10pm I drank the mud that came from McDonalds and it was all I had. Since then I understand their coffee has improved but I have never been able to bring myself to drink it. I have been scarred for life, I guess.

            Now I have been making and drinking coffee regularly since the eighties. My mother first made coffee in a chrome pot that look like it was from the Jetsons kitchen…no I’m wrong…in the eighties it was probably still the Mr. Coffee drip coffee maker we had for ten years. Anyhow, my mother switched back to an electric perk coffee maker after that automatic drip coffee maker finally died. 

            Otherwise, my love affair with coffee came from an old small-town diner or what we called the coffee shop back in the olden days (I’m still stuck in the eighties for you young people). It had a coffee machine that took up most of the owners (who was also the cook) entire counter. There was hot water that came out of the center spigot for tea or hot chocolate. Then there was an orange one for decaf coffee. Then lastly, a black handle for the regular ambrosia that flowed out of the last spigot. I even stood there in awe one day and watched him make the coffee once.

To make coffee in such a large quantity he needed to fill a large aluminum pot that had a black Bakelite handle on it. He then added a pound of coffee to a huge coffee filter and placed that in this time warp of a machine. He next began to pour the hot water over the grinds as a clear glass tube began to show how full it was with its black gold. He filled the pot again from the coffee spigot now and repeated the whole process two or three times until the coffee ran a rich deep black from the spigot. He then put the pot down and filled a large Styrofoam coffee cup (I know, don’t get me started on Styrofoam cups that are now band from use). I will save that rant for another day. Next came sugar and milk. I drank my coffee regular. Regular coffee is what you called coffee with caffeine that included a normal amount of milk and sugar. This is how MOST people drank their coffee back then because this predates Starbucks! The coffee was extremely hot so back then I blessed the Styrofoam cup for saving my hand although I always managed to burn my mouth on days when I could not wait long enough for it to cool off at all. Thus, became what was a slippery slope of coffee all winter and iced tea all summer and beer on the weekends. Although I did not drink half as much iced tea as I did coffee or beer or so it seemed.  

What were we talking about? Oh yeah, the coffee recipe. Let’s see I will have to put this in my new “How to cook book”:

Coffee

The first thing you need to do is, choose your coffee pot. My go to coffee pot right now is that old standby from Corningware. It’s that 1950s everything needs chrome top and the bottom is that classic ceramic white with blue cornflower’s base and it even has a wonderful black Bakelite handle (see picture below). It is a stovetop percolator with a little glass topper so you can see the coffee “perking.” This is a coffee pot that is not even made anymore. That’s a shame too because it makes a great cup of coffee if you’re not in a rush. This coffee pot will soon get stored away for days on end until the power goes out once again. I am using it now as my old electric perk percolator pot died and was put to rest with great fanfare and a long ceremony. I ordered a new 12-cup electric percolator coffee pot by Hamilton Beach or Farberware for everyday use. My recent purchase of a Preso brand one seems to be letting me down and making weak pots of coffee on some days that are completely undrinkable and I needed to remake the entire pot. So it too was send off to the great land fill in the sky but with less fanfare.

If you are grinding the beans yourself then coarseness of grind should change based upon the pot you are making the coffee in. Course ground coffee is what is used for my percolator coffee pot or French Press, medium grind is for the automatic drip makers (like that old Mr. Coffee machine), medium fine is for those huge commercial pour over things that looked so cool and steam punk back in the day. Then there is fine ground used for espresso machines. There is also extra course for cold brew (really you can’t just chill it?) and extra fine is for people who just snort the stuff like cocaine (just kidding kids! Don’t do drugs!) Extra Fine ground is for Turkish coffee that I have never had. Here is the recipe for eight cups of coffee:

INGREDIENTS:

7 to 9 tbls. ground coffee

8 – six-ounce cups of filtered water (six-ounce cups?! what? That is what those stupid lines are for! Who knew? Ugh, now a whole pot of coffee is not even a whole 8 cups! Why?! So be careful, there are 8 ounces in 1 cup therefore ¾ cup = 6 ounces in America. That’s too much math so early in the morning so I use the dam lines! Sheesh!

DIRECTIONS:

Let us start with the water. Bad water means bad coffee or bad tea. MOST commercial places always have a filter somewhere on the water line that leads into the back of the commercial coffee pot. If they don’t they should! What do I do? I use the ice-cold water that is also filtered that comes out on my refrigerator/freezer. I fill the pot to the 8 “cup” mark that is located on the inside of the pot. Why cold water? Never cook with hot tap water. That is just nasty, ewe. Cold water works better when used particularly with an electric percolator. Like the one you own but never used but purchased it for large parties but then put it in the back of the hall closet. Yes, that one works best when you start with cold water. Next, add a coffee filter to the basket. No one likes grounds in their cup. “Tt’s the Grim!” Well that was tea in the bottom of the cup…if you read Harry Potter. I digress. Lets’ add the coffee already as I’m falling asleep. Now plug it in or turn it on and let it do its thing. Mine, is manual so I actually have to turn on the stove to high. I have to remain close by and wait for it to start to perk. Annoying huh, but it’s cooking! Then when it starts to perk and I can see it, remember that little clear glass thingy on top? I turn the heat down to medium-low so it remains perky (perky get it? its coffee) Never mind, and set the timer for seven minutes. Now if you like your coffee richer or more flavorful this is where the COOKING part comes in. You can adjust the recipe to YOUR taste. If your using an old fashioned coffee pot or camping style coffee pot you can start by increasing the time you cook the coffee by one or two minutes. Next, you can add a tablespoon or two to the seven that is already in there. Each time you try something new make a note of what you did mentally or if you’re tired because it so early in the bloomin’ morning and won’t remember the next day make a note of it on your phone! Once you get a perfect pot of coffee repeat the same steps! Wa-la your cooking! After the seven minutes are up, I turn off the stove and let it stand so the coffee in the basket now filters all the way through (aka finished cooking/perking).

Was this a long version of how to make coffee? It probably was but just as in life when you’re going to a dull meeting at work or camping with a bunch of teenage energetic scouts this is an adult’s life line to their sanity! Therefore, a good cup of coffee is a life saver! I myself just love coffee. It is probably my second favorite beverage. They are in order: beer, coffee, and filtered water for which you can’t make the previous two without.

Until tomorrow. Stay awake, be happy and eat well.

The Drunken Chef (AKA Russ)

© Russ Ahrens and The Magic of a Perfect Pairing,2023

An amazing Merlot that I could enjoy all on its own

Scott’s wonderful chili and wine pairing
My Coffee Pot