INGREDIENTS:
4 boneless and skinless chicken breasts (8 thin cutlets)
3 eggs
½ cup flavored bread crumbs
¼ cup vegetable oil or peanut oil
DIRECTIONS:
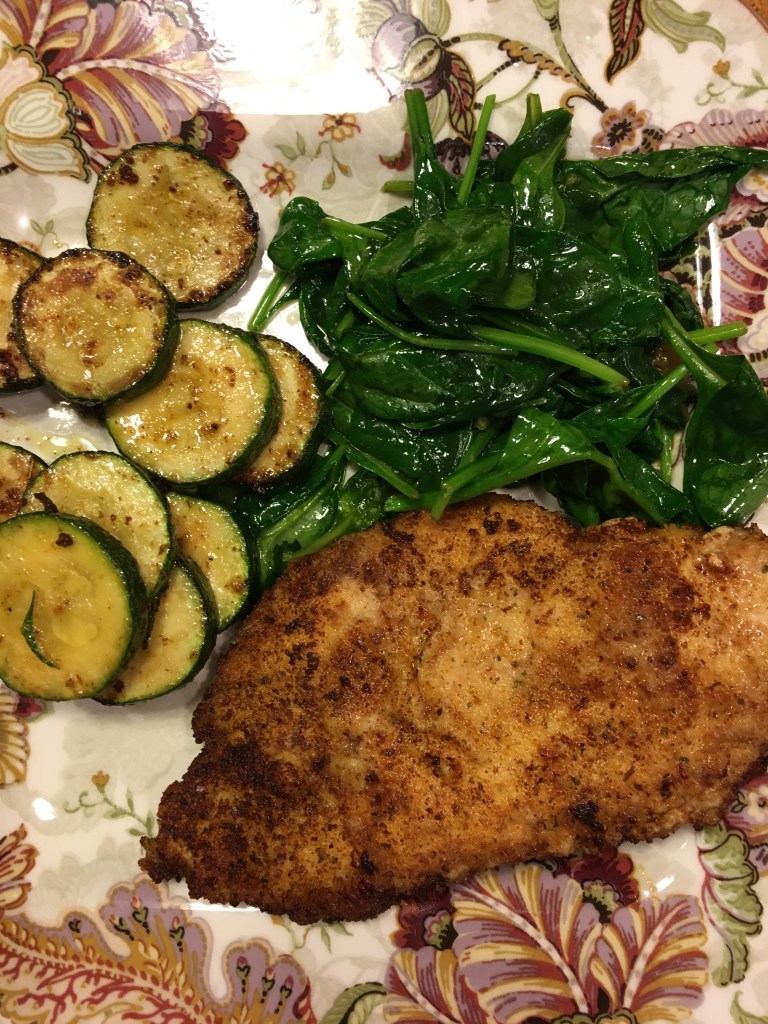
Slice thick chicken breasts in half so they are thin. Pound all chicken using meat tenderizer/mallet to ½ inch thick. I use parchment t paper or handy wrap on top so the chicken isn’t all over the mallet. Beat three eggs in medium size bowl. Heat large frying pan and oil over medium to medium high heat. Dip one chicken beast at a time into egg mixture. Then, coat with breadcrumbs by pouring ½ a cup of breadcrumbs into a clean dish. Place chicken on top of bread crumbs and cover with more breadcrumbs. Press then bread crumbs firmly onto the chicken using fork or your hand. Flip the chicken over and press chicken into breadcrumbs again. Lightly shake off excess bread crumbs. There should be no egg showing. Place chicken breast onto a plate. Now you can move those chicken breasts into a frying pan. Add the tail end of the chicken into the pan facing away from you so if the oil splashes it splashes AWAY from you and not on you! Cook the chicken until the bread crumbs brown on both sides. Drain cooked chicken on paper towels before serving. You can test the chicken with an instant read thermometer to see if the chicken is done. Chicken is cooked through at 160 degrees. They cook a little more while standing too so be careful not to over cook them. You can place them in a 350 degree oven to finish cooking if your worried and even leave the paper towels underneath or you can place them in the oven to keep warm until they are all done.
Pro Tip: If you find your bread crumbs fall off the chicken, make sure your pressing those bread crumbs into the egg on the chicken during the coating process. I also “stage” newly coated chicken breasts on a separate plate because I can usually coat them in bread crumbs faster then they cook. You may want to bread the entire batch of chicken first. Then cook them afterwards so you can watch them closely and so you don’t burn them while being detracted. I add extra bread crumbs on top between the the layers so they don’t stick together on the plate before they are all cooked! Remember too that you should adjust the heat under the pan as you cook. Just like when we were making pancakes you don’t want to burn the outside of them and have raw chicken in the middle. That means the heats up too high. If they are not browning fast enough then the heat is too low and they will be greasy when done from sitting in the oil too long. Science and this cooking $%#@ isn’t always so easy.
Practice makes perfect and there are lots of recipes to come using chicken cutlets in the future! So cook and practice, cook and practice, cook and eat or drink!
For extra crispy cutlets, use a flour dredged prior to the breadcrumbs.
EXTRA CRISPY CUTLETS:
INGREDIENTS:
4 boneless and skinless chicken breasts (8 thin cutlets)
3 eggs
½ cup flavored bread crumbs
¼ cup vegetable oil
½ cup flour
DIRECTIONS: Slice thick chicken breasts in half so they are thin. Pound all chicken using meat tenderizer/mallet to ½ inch thick. Beat eggs in medium size bowl. Heat large frying pan and oil over medium high heat. Dip one chicken beast at a time into egg mixture. Then onto a plate with the flour. Coat boat sides. Return floured chicken to egg mixture. Don’t worry as some flour will come off into the egg. Then coat with breadcrumbs by pouring ½ a cup of breadcrumbs into a clean dish. Place chicken onto on top of bread crumbs and press firmly using fork. Flip chicken oven and press chicken into breadcrumbs. Lightly shake off excess bread crumbs. Place chicken breast in frying pan and cook until bread crumbs brown on both sides. Drain cooked chicken on paper towels before serving.
© Russ Ahrens and The Magic of a Perfect Pairing, 2021