Bring water to a rolling boil. Add eggs to boiling water with a slotted spoon. Return to a boil and cook for for 4 to 7 minutes for large eggs (I recommend 7 minutes for a soft cooked large egg directly from the refrigerator). Cook longer for Jumbo size eggs. I also recommend Jumbo eggs. Remove the eggs to a shot glass. Crack the upper half of the shell with the back of a teaspoon and peel it off. Slice off top with a knife. Salt and eat. Serve with buttered toast strips.
Toast strips: Butter warm toast and cut into one inch strip for dunking into the eggs yoke.
NOTES:
This was something I ate as light meal for when I had an upset stomach or when recovering from the stomach flu.
Bring water to a full boil in a large pot. Add eggs to boiling water slowly one at a time with a slotted spoon. Return to a boil and cook for 12 to 15 minutes gently boiling. For larger eggs a longer cooking time is required, (15 to 18 minutes) for Jumbo size eggs. Remove the eggs to a bowl filed with ice water and place in refrigerator (for best results overnight).
KITCHEN TIP: Peeling Hard-Cooked Eggs
To ensure that the shell of a hard-cooked egg peels off without leaving chips or gouges, use this technique. Before cooking, prick a tiny air hole in the wider end of each egg with a tack or push pin. Remove the eggs from the hot water with a slotted spoon and plunge them into ice water. When chilled thoroughly, the shells should peel right off.
Green Yolks The occasional green-gray discoloration on the surface of hard-cooked yolk is a harmless compound of iron and sulfur. High temperatures and prolonged cooking time produce more of a discoloration. Yolk greening can be minimized by using fresh eggs, by cooking them as briefly as possible, and by cooling them rapidly after cooking. The green also looks bad if you use them to make Deviled Eggs (recipe to be posted in the future).
NOTES:
When making the entire dozen eggs, let eggs stand out and come to room temperature before cooking for best results.
This was my mother’s favorite item to have when we went out on my brothers boat. A hardboiled egg along with her beer. Yum.
Electric egg cookers use steam and that is the best method of making hard boiled eggs if you need to own another small appliance this is a good one. Especially if you like to make deviled eggs!
Now with eggs under our belt we should talk about Omelets and how to make them, by the way which is correct? Omelet or Omelette? I can tell you that Microsoft Word does not like the French spelling and that figures, since it uses an American English dictionary to correct spelling errors. Since I am teaching an American Style cooking here (at least I’m trying too), I think we will stick with the American spelling too – Omelet. Isn’t the English language hard enough WITHOUT multiple ways to spell the same F#$%^&@ word! UGH! Can I also say that as an amateur writer how I think, speak and write are three different things! For starters, I could never write down everything I think. I would possibly receive a lot more hate mail. So therefore, I bite my tongue as it were when it comes to my opinion on politics sometimes. Besides you are all here to cook and have fun. Not to listen to my political or religious views here. It is also tougher for me to write stuff because I can’t write the same way as I would casually talk to my friends because it would be too difficult to read. Once again, I blame this stupid language for not making things simple. Come on people, it’s the 21st Century! Can’t we make things easier to read, write or speak to each other? Maybe, that’s half the problem with governments. They have to write everything down, then two hundred years later they argue over it because someone thinks it means something different NOW! Okay done ranting. Let’s cook.
So you’re ready to step up too one of my all-time favorite breakfast foods: The Omelet! If you want to put more than just cheese in it then that means learning how to do some slicing, dicing, and chopping. As I look around for my YouTube production crew it seems they have all left…or are still nonexistent. That means I will be writhing this it all out. Maybe later I can read it from the teleprompter as I record this lesson on my cell phone (me laughing to myself).
Let’s start by learning how to do some slicing. Round things like potatoes and onions should first be cut in half. Wait! Wait! Not yet…Lets peel that potato with a vegetable peeler first. Peel the skin off AWAY from your body and make sure your other hand has a firm grip on that slippery potato. Make sure too your hand holding said potato is also out of harm’s way. Vegetable peelers, when new will be sharp and that’s good. The older it is the more dull it will become and the more difficult it will be to use. Work your way around the potato making sure to slice off the entire outer layer. You can use a paring knife to carefully remove the deeper eyes of the potato or deep gouges. Now you can wash that slippery sucker. Some people wash it before they peel it but I say: “Six of one, half a dozen of another.” I wash it after peeling it.
For an onion, you need to peel the outer layers off by hand. If you want to dice or mince the onion then begin by placing it down on your cutting board. Hold it firmly with your non-dominate hand (that is the hand opposite of the one that is now holding the sharp knife). Cut off the top of the onion (the opposite side of the root end). Now turn the onion so that the flat surface is on the cutting board. Slice the darn thing in half. Now you can easily peel off those brown layers of tough to chew skin.
Perfect! Now place the halved onion back of the cutting board with the large flat side facing down. Then cut off the root end. From here, you can slice it up. Working your cuts (slices) from the tip to the root end. Wha-lah! You have a sliced onion! To dice it, cut the onion into strips but not all the way across, and only go as far back as half way. This leaves the root end intact. Now turn the onion 90 degrees (that’s a quarter of a turn). Then, just like you did before cut slices across the onion so it will now form small square-like shapes as it falls away. If you want minced onion, just make your cuts all closer together. Too really mince it, put a chopped onion on the cutting board and use your brand new ZYLISS Zick-Zick classic food chopper! Then presto! One perfectly minced onion! I also have a nifty little onion holder that looks like a fork like thingy to hold the onion in place, but I never use it myself. My mother loved it because of the arthritis in her fingers made it difficult for her to hold an onion.
The potato is next and should be first cut in half, then each half into thirds then turn all three pieces together 90 degrees and cut it four more times. *Poof* Diced potatoes.
How about pre-sliced deli ham? Roll up three slices of ham. For thicker cuts of deli ham or corned beef say 1/4 inch thick lay it flat. Slice them all the long way into strips or Julian. Then turn it and cut it into cubes or diced ham or corn beef!
Green bell peppers. OH boy! For this, there are more YouTube videos then Carters has pills! Cut off the top. Then Slice right down the middle. Clean out the seeds and the white pithy bitter membrane. Slice into strips AKA Julienne. Turn and then cut those into dice.
So let’s see we have two large or jumbo eggs, diced green bell peppers, diced onion, diced ham and even diced potatoes. That sounds like a fine western omelet (with potatoes).
Start by cooking the potatoes first in a small 9.5 inch Gotham copper non-stick pan with a tablespoon of oil over medium heat. When they start to brown, add the onion, green bell pepper, ham and cook for two or three more minutes over medium heat. While that cook’s scramble two large eggs that you have added a tablespoon of milk too. You can also add black ground pepper and three drops of tabasco, should you desire. Now add a tablespoon of butter to the pan. Wait until that butter is all melted and it starts to sizzle. Then pour the scrambled eggs into the pan and cover it with all those yummy vegetables and the ham. Turn down the heat to low and cook covered until the top is almost firm.
“Now comes the tricky part” as I hear Julia Child’s voice in my head, “flipping the omelet”. First time flippers should use their brand-new and wonderful “pancake turner” that they just purchased from Amazon and received the next day. I have managed to learn (over too many years of trying) how to flip my omelets in mid air. Please do not practice that with your first-time omelets but you can start practicing that trick later on with one of your fried eggs (if you dare) and only if you don’t want that egg over easy with an unbroken yoke. Pro tip: if you not practiced at it the yoke may break when it slams against the pan.
There you go, one western omelet done to perfection. Much simpler to make is the plain cheese omelet. Preheat your non-stick pan with a tablespoon of butter. When the butter starts to sizzle and bubble the pan is hot and the butter is ready to cook in. Pour in your newly scrambled eggs and cover that puppy up. Let that cook on low until the top is firm. Add the cheese onto half of the omelet. The cheese selection is your choice. I like Kraft Deluxe American cheese for this. Why, because it is real American cheese not some processed cheese “product”. That’s why it costs more than the crappy fake cheese. Cook covered over low heat for one or two more minutes. Then fold your omelet in half and remove it to a plate. Add buttered toast, orange juice and serve. Don’t forget about the coffee that is posted next in lesson four. See we need coffee!
Other stuffed omelets are made the same way. Once the top is firm, add mushrooms and Swiss and cover or add broccoli and cheddar or salsa and Monterey jack or Spinach and Gruyère. You get the idea.
Did I mention the coffee, don’t forget the coffee…
Omelets are a great way to start to experiment with flavors and cooking! A good tip would be to blanch or steam your vegetables like broccoli but not spinach in advance. This is also a great way to use MANY leftovers like corned beef. These are also great for lunch or a light dinner!
To blanch something place it into boiling water for a few minutes then plunge it into ice water to stop the cooking process.
Boil vs Simmering – Water at a boil will produce many bubbles that will rise up and beak the surface. Simmering will only show small bubbles on the pots bottom.
Now you’re cooking!
Until tomorrow, be happy, stay healthy and eat well.
This is a side dish recipe. However, in my “Recipe Book” everything is in alphabetical order and grouped together only in the index by categories. Here it is just a post in the “Recipes Section” like I promised.
I used Yukon Gold Potatoes and added the roasted garlic because I had some on hand. What’s that? You want a how to roast garlic recipe? Sure let me go type that right up. First, I’m going to go have beer and wait while my editor takes at look this post. Then he has to look at the Pot Roast post that goes with the mashed potatoes!
INGREDIENTS
5 lbs. of Russet or Yukon Gold potatoes
1 stick of Butter
½ cup half and half
¼ cup whole milk
Salt
White pepper
5 Cloves of roasted garlic (optional)
DIRECTIONS
Peel and cut the potatoes into 2 inch pieces. Cook the potatoes in boiling water about 20 minutes. Test the potatoes with fork for doneness. Drain the potatoes (in colander) and then return them to the pot. Add the butter in tablespoon size pieces; add cream, milk, salt, and pepper. Add cream and milk slowly as not to cool off the potatoes to fast or have it slash out while mixing. Using an electric mixer set to low, beat the potatoes until there are no lumps. If you do not own an electric mixer you can buy a hand “potato masher”. Some people actually prefer using one of these as they like the “lumps”.
NOTES: My mother never used half and half just whole milk. I find the ½ & ½ gives it a nice extra richness. I don’t make mashed potatoes every month so I can splurge on the extra butter and cream.
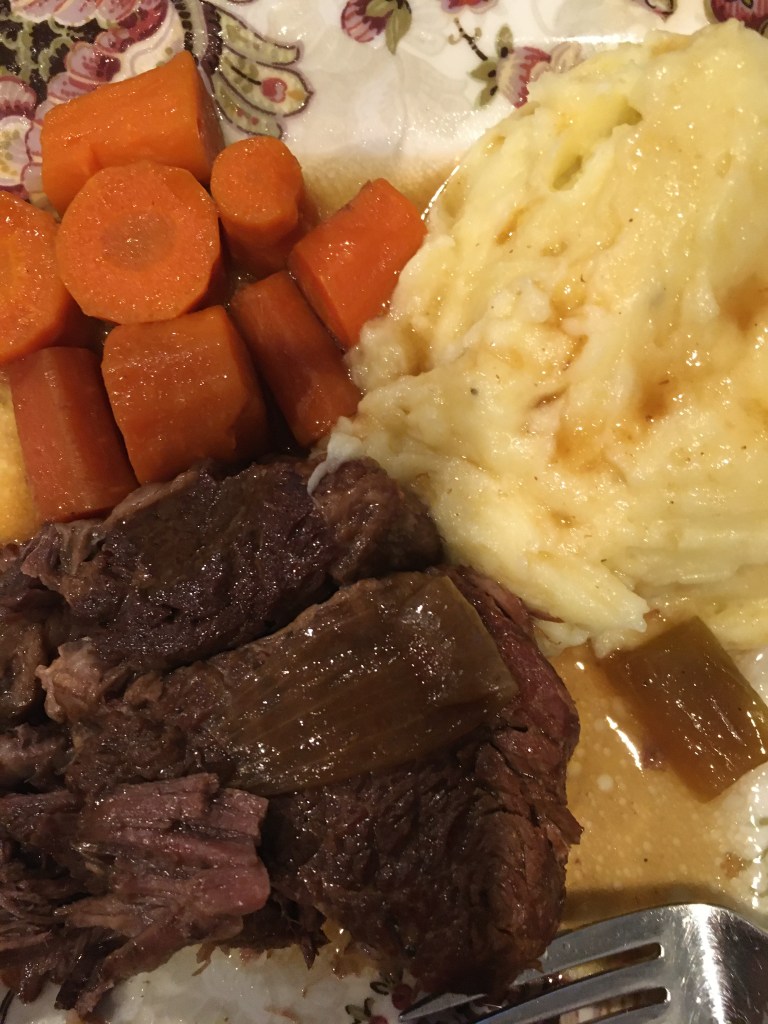
Last night was the all American Favorite “Pot Roast with Mashed Potatoes” or as I once had in a dinner located down in South Carolina, “The Blue Plate Special”. Man was it good too!
So our first main entree’ recipe is as follows:
COOKING UTENSILS NEEDED
Instant- Pot (6-quart or larger)
Large serving fork or tongs
Wooden Spoon
Chef’s Knife
Cutting Board
INGREDIENTS:
Chuck Eye Roast (4 pounds)
2 Pounds of Carrots (I really like these carrots when done)
1 tablespoon tomato paste
2 to 3 stalks celery
2 cups water
2 medium onions – peeled and sliced in half
3 cloves of whole peeled garlic
1-2 tbsp. Olive Oil
2 tsp. beef bouillon or one bouillon cube
Garlic powder, Salt & Pepper to taste
DIRECTIONS:
Prepare the chuck roast by sprinkling it with salt, pepper and garlic powder on both sides of the meat. The beef I used this time looked like a 3-inch steak (buy two). Sometimes it’s a whole 4 pound roast that is oblong. What ever the shape, season it all around. Add the oil to the bottom of the Insta-pot and turn on to Sauté. Brown the meat on both sides. Remember that your beef should be dry before you try to brown it. If your beef is wet then it may steam and turn grayish looking instead of browning. Why do you want it a little brown on two to four sides? TASTE! The browning effect is the cartelization of the sugars and it makes your dish taste richer. Trust me there is a reason for EVERYTHING! I had two steaks so that four sides for me. A roast would be the something. Brown four sides of a whole roast. After your meat has browned, remove it to a plate on the side.
Pour in the water to the insta-pot. Add the onions, celery and beef bouillon. Stir with a wooden spoon to loosen the little brown bits on the bottom. This technique is called deglazing. Many times, you might be using wine to deglaze with instead of water. Mmm wine. Add the meat back in and cook one hour and 15 minutes. Yes, leave out the carrots for now. Cover with the lid and cook by pressing the meat button for one hour. Cool for 10 minutes and open according the manufactures directions for letting the steam escape. CAUTION!!! Steam burns hurt and can be a serious injury. Follow the directions! I use a kitchen towel to cover the vent and oven mitt to open the steam valve!
Once the steam has escaped completely and the little pressure gizmo has fallen down carefully open the lid. I cannot reiterate this enough: Be carful of the steam!
Now add the carrots to the top and make sure they’re in the sauce/juice.
Close her back up and cook one more hour.
Cool and repeat the opening process from before. You can let the meat rest and cool off in the pot while you make the mashed potato recipe found on another page!
If you want, gravy here is a quick recipe for that:
Gravy
3 cups of dripping’s (Dripping are the Juices and fats that the meat cook in)
¼ cup water
3 tbsp. flour (one tbsp. per cup of drippings)
Remove the meat and then the vegetables from drippings by pouring through strainer or colander. Cover everything with foil to keep it warm. Return the drippings and the pan to stove over medium.
In a measuring cup whisk together ¼ cup of water and flour. Slowly add flour water to meat drippings while continually stirring and heat until thickened.
Serve immediately.
You can also make a flour and butter roué and the meat drippings to that but it’s harder. Maybe next time try that and see what you like better!
Try it and let me know if you have any issues that I need to fix before I print out my first addition of the Recipe Book!
I will post the Mashed Potato Recipe next!
I don’t know how pretty it looks but It tastes better then it photographs.
My mother loved to read the newspaper every day while drinking her tea in the morning. She drank coffee once in a blue moon. She loved the Sunday paper, because inside was the restaurant review section. We did not eat out at restaurants much as kids or even as adults when we all lived at home. A restaurant was left to only enjoy on special occasions like your birthday. It wasn’t until we were all older and working when we stated to take her out on Mother’s Day. Other than that she cooked for us every day. Sometimes she even made separate meals between my sister, brother or I getting home at different times. My sister was not a big fan of spaggetti either. Sherry (my sister) certainly didn’t like it as much as my brother and I did. So my sister sometimes ate something like a meatball hero parmigiana or piece of the pork cooked in the sauce on garlic bread. I think it’s my mother who gave me my love for food and going to nice restaurants so I would like to dedicate this section to her. Since she had grand children that she loved, and so let’s call it “Grams’ Restaurant Review (short for grandma), in her honor.
As to the first selection of a restaurant it was just bad timing that we choose a restaurant that I’m sure my mother is turning over in her grave at. I’m using as the first restaurant a sushi joint. I know exactly what she would say too. “Couldn’t you have chosen a nice sea food place?” My mother was never one to say a bad thing about anyone or anything unless it really got her upset. “Sushi? Really? You should find a nice place that has lobster tails. Preferably the big 16 ounce size or king crab legs.”
Nope, it was Friday night and everyone wanted sushi and wine. Mmm wine. I think, it was Jennifer that chose the actual restaurant as it was closer then one of our usual sushi places in Merrick. Closer, in this case, does mean better. When your stuffed and drunk, a long ride just puts your to sleep afterwards. This was the restaurant that was chosen: The One Sushi & Asian Bistro, Located at 330 Merrick Road, Amityville, NY 11701. My good friend Scott made the reservations for the six of us at 6pm. Six at Six!
Driving up we were very lucky. Not only to find one spot open but two in a very tiny parking lot right out front. There is parking in the back, but it can just feel like such a long walk on my old and tired legs. Closer, in this situation as well, is better.
In attendance was Sam, Alyssa, Scott, Allison, Jennifer and myself. The place inside was clean and it was certainly not over-crowded with people, which was nice. We had a lovely young woman waiting on us who was very polite and friendly. Scott, who has excellent taste, ordered our first bottle of wine. The waitress came back to the table with 5 frosty chilled glasses and a wonderful blue bottle. Yes, it was a white wine, specifically a Riesling from Germany, called Blufeld. Our server poured a glass for everyone but Jennifer who was one of the designated drivers and Alyssa who only had half a glass to taste it because she was also driving. The rest of the icy cold bottle was ours to enjoy. I thought we would each get two glasses but alas you do not get many serving from one tiny bottle of wine. I wonder if they make this stuff in magnums? I then tasted the wine and it was delicious all on its own.
Next, we placed our sushi order. Scott, who loves to pair food with wine, asked if we wanted him to order for us. Now when it comes to food or wine Scott has never let us down in choosing the things we feast upon. When it comes to the perfect pairing of food and wine we are never disappointed. Both Jennifer and I truly appreciate Scott’s recommendations as neither of us can make up our own minds in regard to what we both want off a menu. In the past we always ordered two different meals, or several appetizers and shared them. There’s so many choices and so little time or room in our stomachs. That’s why we minimize portion, to maximize flavor.
I think over the years of going out with Scott, Alison, and Alyssa, to eat everywhere from New York to Florida (I love Disney restaurants) we have eaten some of the best meals in our lives. Scott has a wealth of knowledge about wine as well and pairs it all up perfectly with the food. I guess that why he is a member of the Sommelier Guild.
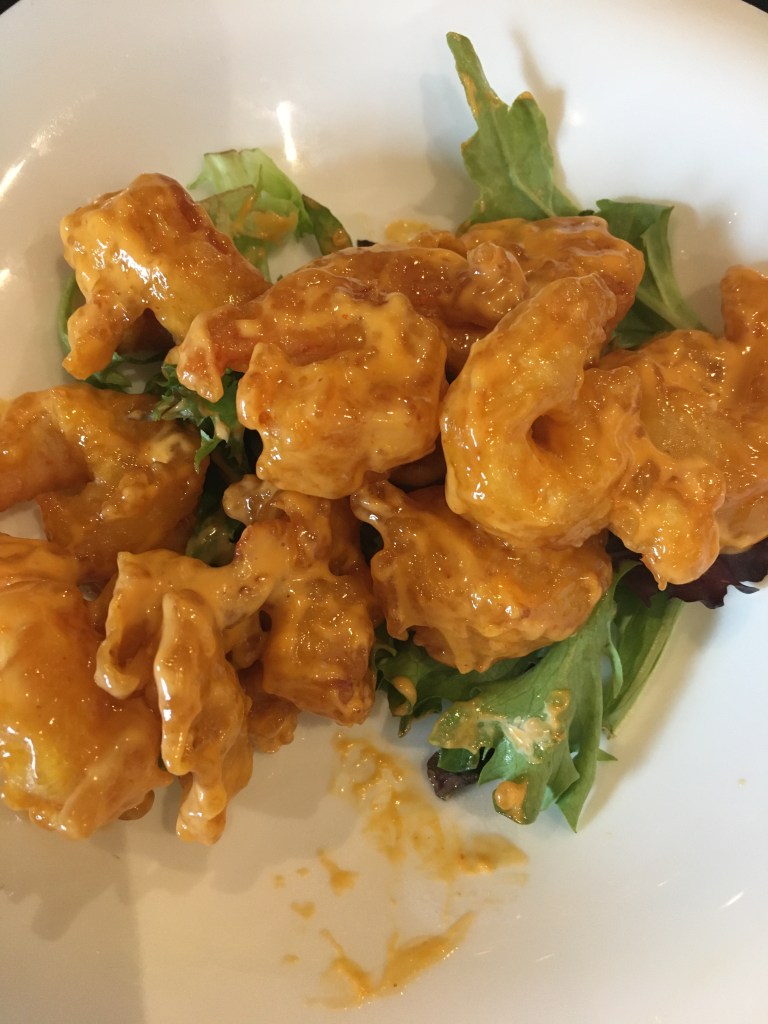
So if the food was going to be suck-ish at least I knew the company was going to be amazing. We started with three orders of rock shrimp (Rock Shrimp is a delectable tempura battered shrimp, coated in a spicy and creamy egg-based sauce). Oh yeah, do you have any idea how annoying it is when one of your friends decides to do a restaurant review that night and now has to take pictures of everything? They were all amazing about it and even offered to help me. So thanks to them we have these great pictures of the plates of food. Despite the fact that I could see a vein popping out of my son’s neck when I stood up in the nice restaurant to achieve photographic mediocrity, he was a champ and took a few photos for me.
Frist was the rock shrimp, like I said. This was one of the best rock shrimp dishes I’ve ever had and Allison thinks it was the best rock shrimp we have had so far. It had a bit of a kick of spiciness to it that paired perfectly with the semi-sweet Riesling. Thanks to Scotts recommendation!
It was time for our second bottle of icy cold wine. It was the same as the first.
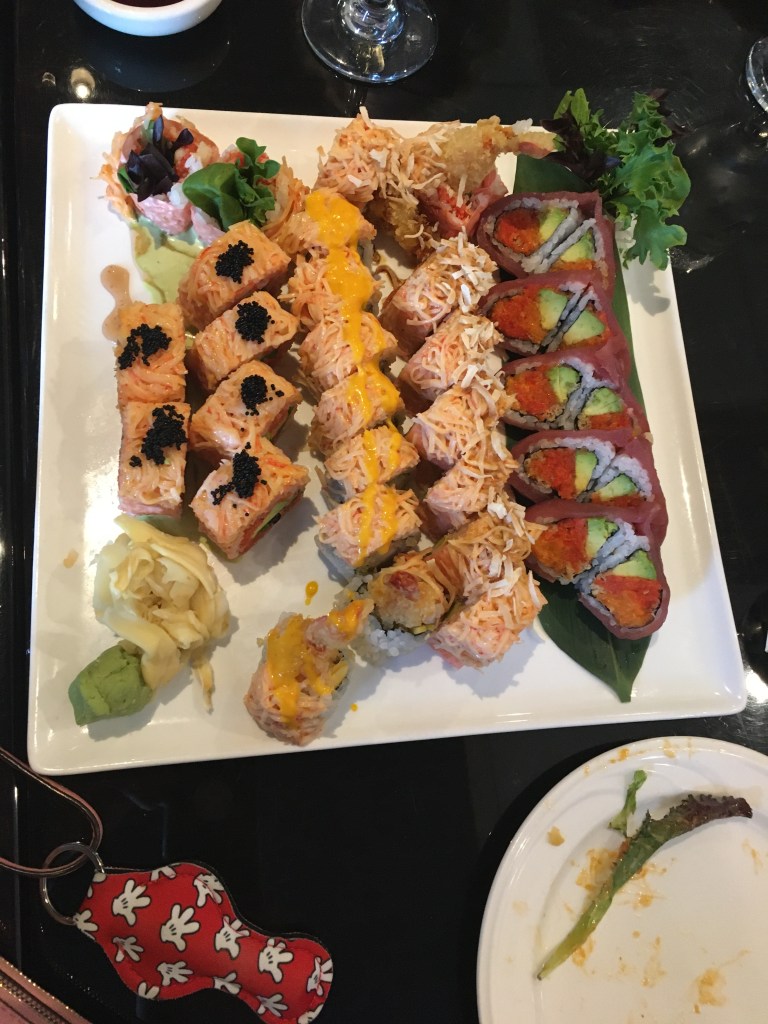
Next was the Lover Roll – I love this roll and have eaten it in a few restaurants before. I think back on the first time I tried this roll it was the best Love Roll I have ever eaten but doesn’t always seem to be that way with everything. The first time you always seem to remember as the best but it probably really wasn’t!
Next was the Loster Lover roll (No kidding! That’s exactly how it appears on the menu!) (LOL who influenced that Lobster choice I wonder?) It had lobster in it so what could be bad about that. Nothing, as it turned out, it was quite good. Plus, it had black caviar on top!
The Angry Dragon roll – This too was delicious. Like many of H.P. Lovecraft’s monster’s it was too insane for words. in the words of my son, “Simply divine”.
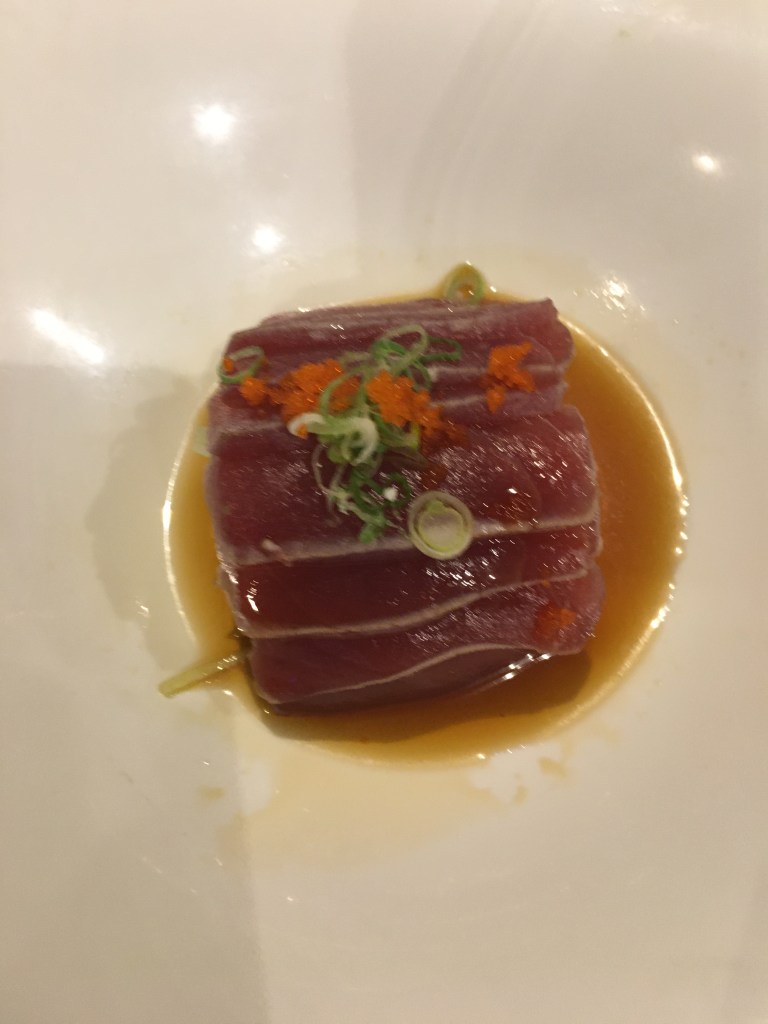
Lastly was a roll with two kinds of tuna. Spicy tuna and tuna right on top and rolled with purple rice! I didn’t think it looked great because it was so purple but it too was delicious.
Then we ordered one more botte of wine for our last three dishes. However maybe we should have changed it up because it came out room temperature. I don’t remember the waitress saying anything either like “I have no more cold Blufeld wine. Perhaps you would like something different.” Maybe she just thought we were all to drunk to notice, but we did. We certainly would have let it sit in the ice bucket before drinking it!
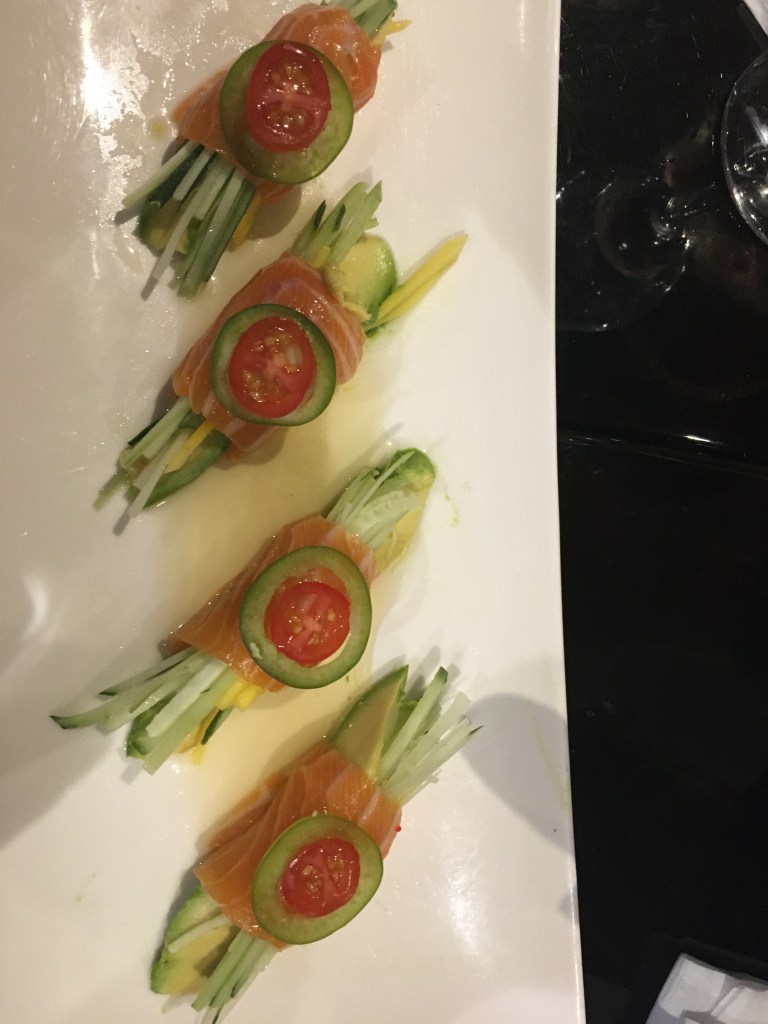
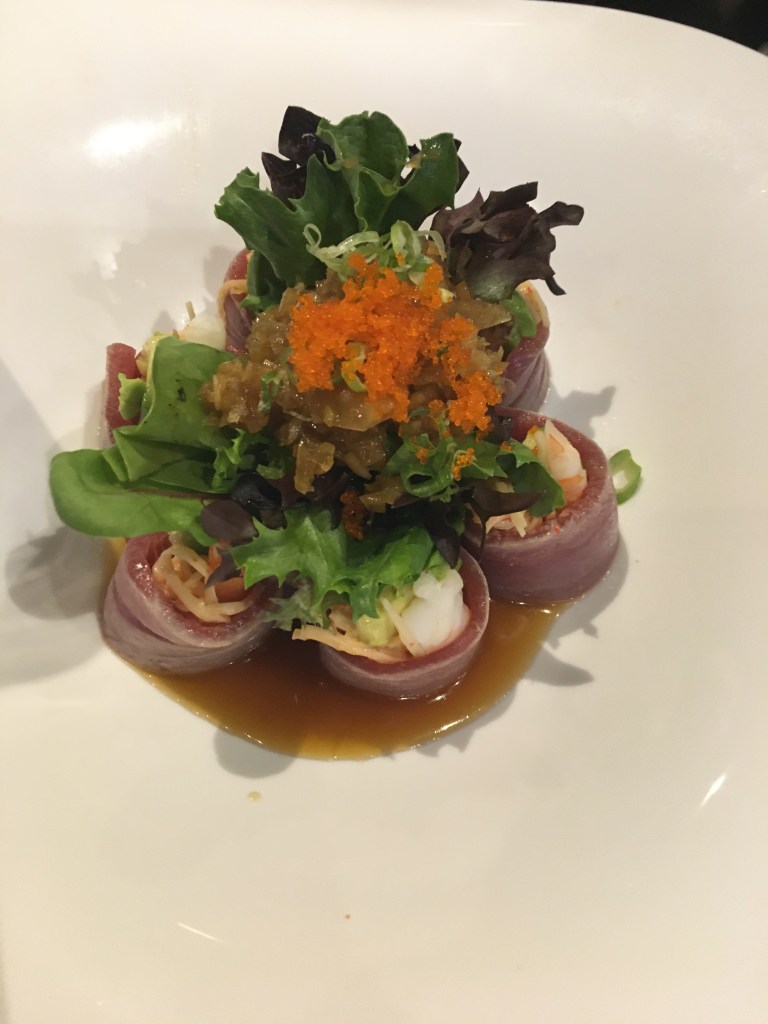
Scott ordered our next three dishes. Tuna sashimi, a salmon ceviche topped with tomato and jalapeno and a tuna round with a beautiful salad on top. I’m guessing Jennifer and Alison ate the salad because I know I didn’t. Not with all that sushi I was worried about eating it all but we managed to finish every piece! They were all fantastic too! Where did they lose ½ a star? The warm wine of course! It was only half too because the first two bottles were perfectly chilled and the frosted glasses were a nice touch!
All in all it was a good time and good time was had by all. Especially since, it was all topped off with ice cream Sundays that were purchased at the Carvel in West Islip. Paul always does an amazing job and this was no exception. I’m sure you will be hearing more about Paul in this blog and his ice cream all throughout the year to come. Thank you Paul and the Scouts thank you too!
So go if you have the chance, be adventurous and eat sushi and/or sashimi and enjoy yourselves! I think of all sushi as just the vehicle to enjoy soy sauce and wasabi!
Stay healthy, be happy and enjoy everything you eat and drink!
The Drunken Chef
Chilled GlassesThe Perfect WineRock Shrimp – the first course. Then more wine.Second course with more wineStill Second courseThird course – third bottle of wine Last dish
Pictured above is the Scouting Cooking merit badge. This merit badge is offered to scouts starting at the age of 11 years old who can master cooking for a small group their own age. Surely, if a young man or woman at the age of 11 can conquer this task in the adverse conditions of the great outdoors using only charcoal and a camp stove, you can do it in the comfort of your own house in a nice warm kitchen with pots and pans along with hot and cold running water.
This book will explain the basics and is the companion book to “The Recipe Book” as well as future videos from the “Teaching a human to cook” series. Explaining anything to a man is never easy. We have the attention span of a GNAT and if I can do it while drunk from drinking beer or wine, you can do it easily sober. Cooking doesn’t take much thinking; you just have to be paying a little bit of attention so things don’t burn. Here you will be shown the skills needed to cook. Then it is up to you to take your time, practice, drink and enjoy cooking. I usually drink while I cook and cook to relax or is it drink to relax and cook to eat. Either way this should be fun. The exception of course would be if ANY scouts were involved. Then drinking anything but water or coffee is strictly prohibited. So lets begin.
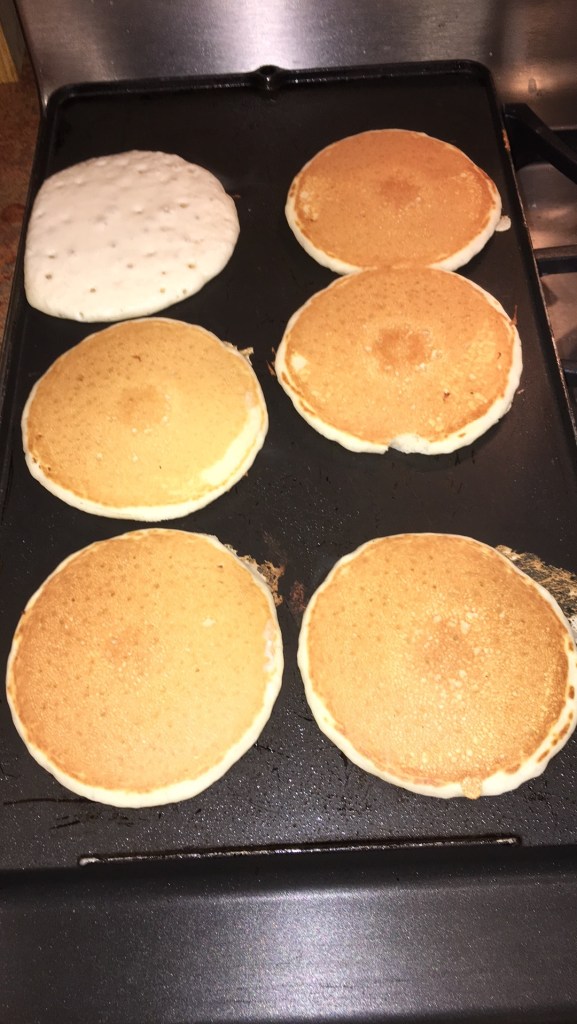
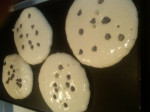
Lesson one: Pancakes. This is as simple as it gets. Start by preheating your largest non-stick pan or grill. I own a Coleman heavy duty cast aluminum nonstick camping gill. It covers two burners on my stovetop and is made to last. I can make up to eight pancakes at once on this baby. Next comes preparing the batter. TODAY – you can buy pancake mix that is already “complete”. Just add water and there it’s done. Well I lied, there is a little cooking involved. So you will need a pan or grill, a spatula, and a spoon or ladle. You want to start off easy don’t you and work your way up. Then BOOM….here you go. Yeah, I know, its “bam!” but that belongs to someone else. Just follow the directions on the box. Step one: Add a cup of water. “Crap now we need a coffee cup”? NO! You don’t use a coffee cup to measure liquids in the twenty first century. You use a measuring cup. “Didn’t you watch the video”? Anyhow, measure the liquid (in this case water) carefully and add it to the dry mix in a LARGE bowl or extra large measuring cup and stir it in. Yes, with a fork or a whisk.
Up until the early 1800s cooking was an art that took a lifetime to learn and all day to prepare. One of the things that made cooking so hard was there were NO measuring cups or measuring spoons! Could you imagine getting a recipe and have to guess the size of the cup or that everyone’s teaspoons were a different sizes as well as their cups! It wasn’t until the late nineteenth century when the Cooking School of Boston and Fanny Farmer wrote out recipes that included even measurements. This was the first time in American cooking that graduated measuring cups and spoons were used to make using a recipe the same for anyone who could get the equipment. Remember too that she was still cooking using wood or coal for heat.
Ok, back to our recipe and cooking in the twenty first century. Can you tell me what’s happening? “Yes, yes (eye roll) your cooking very funny”. What’s happening in the bowl? The water is being absorbed by the flour and there is also a leavening agent in there to make the pancakes light and fluffy called baking powder. That’s why those little bubbles are forming. It is actually double acting baking powder. That means it bubbles once because of the chemical reaction with the acid of buttermilk or cream of tartar and the base of baking soda. Then the second reaction occurs when you add heat or pour the batter onto the pan. “POOF” – it forms even more bubbles and rises on the grill.
{Trivia note} Cream of tartar has been around for centuries as it is formed naturally on wine casks and wine corks. Cream of tartar also known as Potassium bitartrate, also known as potassium hydrogen tartrate, with formula KC4H5O6, is a byproduct of winemaking. Mmm wine.
WAIT. Let the batter sit on the grill and as much as you want to touch it…..watch it, now as the edges just begin to harden and see bubbles in the center- Flip it. “YES! with a Spatula or as we called it in my house growing up a Pan Cake Turner! It should be anywhere from golden brown to a deep a rich brown. See, remember this is where the paying attention part comes in. I hope you have not had too many Mimosas or Bloody Mary’s yet.
So, how do they look? Too fat you say? You can add a few tablespoons more of water and thin out the batter or are they too thin? Add more mix…..SLOWLY! Cooking is half science and half well a crap shoot!!
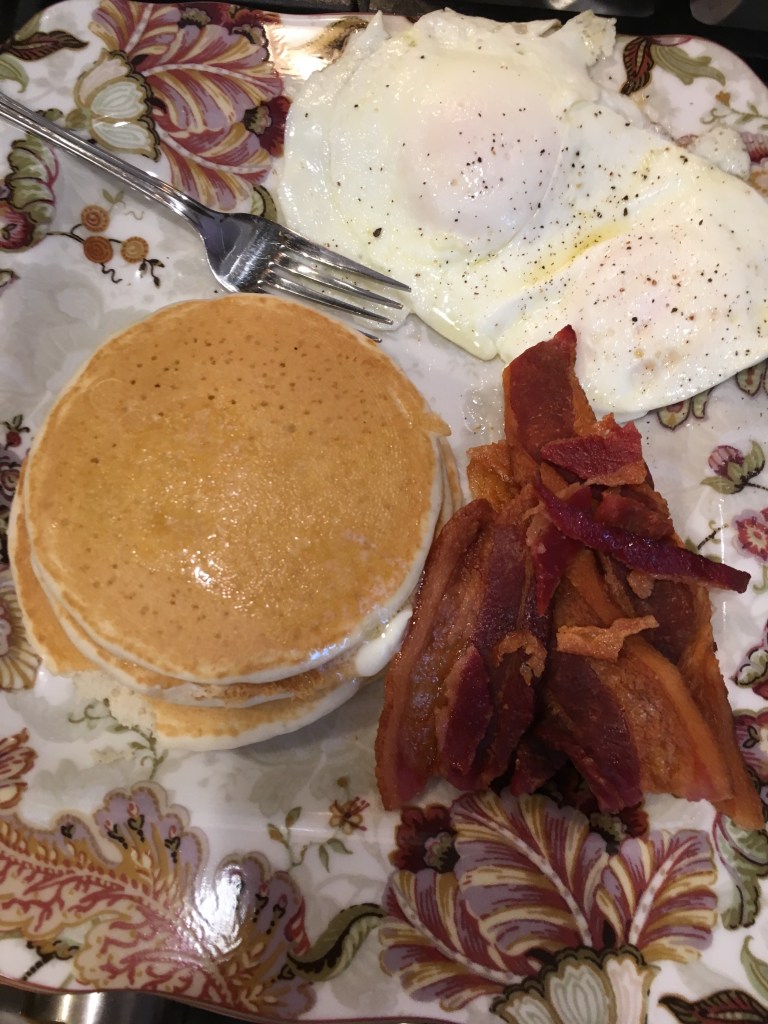
You just cooked your first meal! BREAKFAST IS SERVED!!! Don’t forget the butter, the maple syrup and your mimosa (or some peoples fave, a Bellini).
Next, we can get all fancy and add eggs, sausage, bacon and fresh squeezed OJ. Nah, I’ll just stick with the Mimosa. You can also try making the pancakes from a recipe from scratch or trying many different variations of pancakes like chocolate chip or blueberry. Just remember to practice your new cooking skills to get better.
How about waffles next! It is basically the same concept but now you need a specialized piece of equipment called a waffle iron. NO, it won’t work on your clothes. It’s not likely that you can make these on your next camping trip either. This process is just a little bit more messy and harder to clean up so of course I don’t make them often, mainly I keep waffles for snow days or really lazy Sundays. For this you need to buy the ORIGNAL pancake mix and mix up the waffle version is on the back or try using my favorite, Bisquick.
2 cups Bisquick
1 1/3 c milk
1 tablespoon oil
1 egg
Now your cooking! Why is there no baking soda or baking powder? Because it’s in the Bisquick already!
Preheat the waffle Iron. Mix together the batter. Grease the waffle iron with vegetable oil or shortening. Only if necessary. Today most waffle irons are nonstick already therefore you do not need any grease on the grills. Plus, I believe, that when used over a long period of time the spray stuff builds up on the nonstick surface and makes stuff stick to those kinds of pans.
This is just the beginning, the more you learn about leavening agents, flour, water, sugar and fat and how they interact the better of a baker you will be. In the following pages of this book you will learn what happens when you apply heat. When you begin to learn the effects that yeast have on dough, you become more and more of a BAKER! Whoa slow down we are not ready yet for homemade bread but it’s coming along with pizza dough, cakes, pies, rolls pastries and COOKIES!
We have to learn to walk before we can run…..right now at least where moving….crawling but on our way. Pancakes, file it under your first real recipe.
Keep cooking pancakes until our next lesson… Will it be breakfast, then dessert or lunch? Maybe Mimosas… hmmm.
I know what your thinking. This is not much of a recipe but hey if you have never made them it takes practice to make then right and if you have made them do you remember how hard it was to flip them that first time? This is all abut learning how to control your heat and timing. If you really want to learn how to make pancakes for the first time. Visit the “How To Cook” page for the fully detailed article that accompanies this recipe.
INGREDIENTS:
Any Brand of Complete Pancake Mix
Water
Chocolate chips (optional)
Banana (optional)
Whip cream (optional)
DIRECTIONS
Preheat Grill (I have a heavy duty Coleman grill that I use on my gas stove that works perfect).
Mix the batter according to the package directions. I use a 4 cup glass or pyrex measuring cup to mix the batter in. This makes pouring the batter much easier. (My mother had a very old 4-cup plastic measuring cup she used for pancakes and waffles. She would pour the batter from a mixing bowl into the measuring cup). I add about an 1/8 of a cup of milk to the batter to make it a little thinner. Heat grill while letting batter sit. When the grill is hot, stir batter one more time and pour onto the grill. I never use oil or butter because this is a non-stick grill.
Once the pancakes are on the grill then sprinkle the chocolate chips into the pancakes if desired. Flip when edges begin to cook and bottom in golden brown.
Add whip cream and Slices Banana or serve with maple syrup.
I never make them from scratch anymore. I use the pancake mix from a box and the “complete mix” so all you need is water and boom breakfast. I do however use a little milk with this mix. I also like mine with eggs over easy and bacon or sausage.
NOTES My mother only made these on vacation days, snow days or holidays. This was also the first recipe I ever learned to make (so I could eat them more often). The only breakfast we liked better than this was my mother’s waffles (made with an old GE waffle iron) and they were even harder to get her to make because they were more work. The waffle iron was always the hardest thing to clean.
No good cookbook would be complete without this list.
So far this is a short list of things we will be using to cook with in the “How to Cook” section of this website. You may want to keep this list handy like taped to the fridge or even print it out and casually leave it laying about for holiday season and birthday gift ideas for your yourself. Heck just come right out tell your life long partner and all your friends about the list too. This way you can be surprised with presents for a change, instead of flowers or a neck tie for your birthday (not that I don’t love BOTH those things)! The list will be getting longer as I add all kinds stuff to it as we use them to make the recipes I post. I could go on about all the gadgets I have collected in the 30 plus years that I have been cooking but that would take all the fun of it and writing this post would take ALL day. So lets explore all the gadgetry there is out there as we learn to cook with each item together!
Below are just a few items I have used already since starting this project and testing the waters on whether I could write about every meal I make in my kitchen or someone else’s kitchen. The items in green are some of recipes that I will be posting as the year goes on (maybe if I’m tech savvy enough I can turn them into links to the recipe). It will also be pretty magical to see if I can keep this posting stuff up or will I crash and burn and never finish my life long dream of writing my cookbook that everyone can use and understand but only time will tell.
The following is a recommended list of items that I have “collected” and have used thus far:
Oyster blender, bottle and corkscrew opener, cocktail shaker, ice bucket, pitcher, shot glasses, drink glasses, mugs and wine glasses…just to name a few.
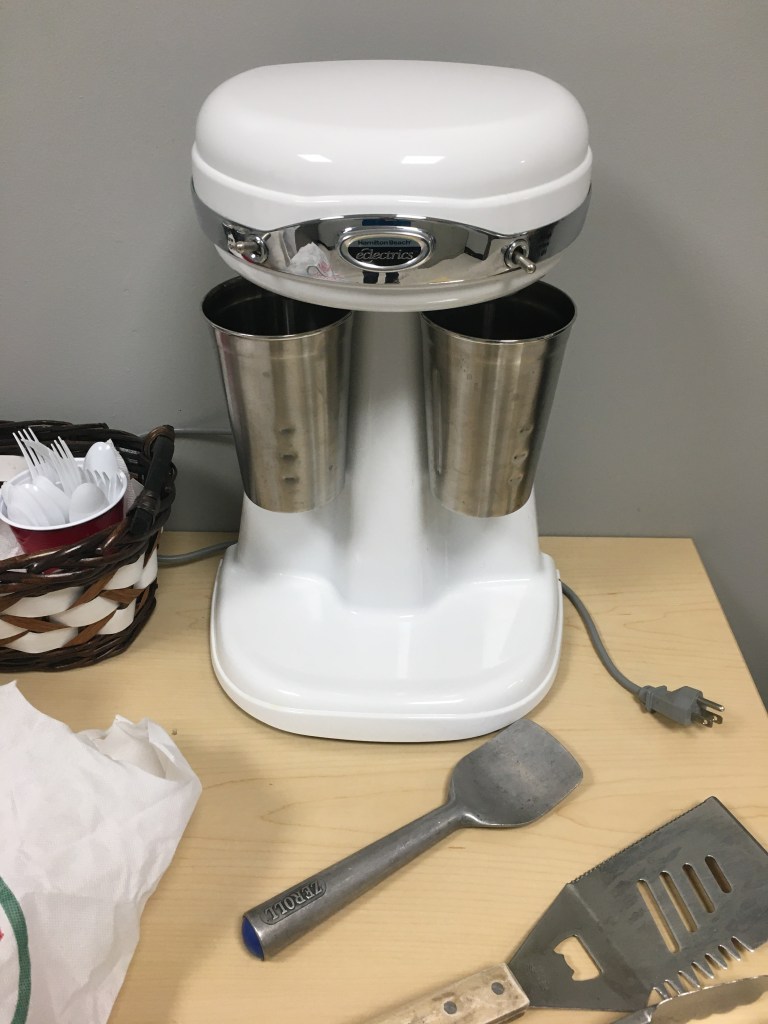
Hamilton Beach DrinkMaster and Ice cream scoop
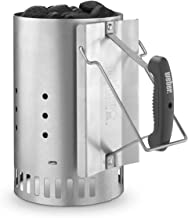
Charcoal Chimney Starter sold at Amazon, Loews and ACE Hardware’s stores
Zyliss Classic chopper. The 18/10 stainless steel blade operates like 5 knives in one. It rotates automatically for smooth, even chopping from coarse to very fine. Sharp enough to chop onions and vegetables. Strong enough to chop nuts and ice. Its easy to clean – just rinse it like I do, then place in the dishwasher. This is Great Gift/present (hint hint). I use it use it for chopping onions as in Meatloaf or Baked Beans mmm beans.
Vegetable Steamer
Used when cooking steamed vegetables like the fresh artichokes I made for Jennifer.
Crinkle is Cut Serrator
Have I made home made French fry’s yet? Nope I guess not but I will do it soon. They are the perfect accompaniment to a grilled steak that is made over charcoal! My crinkle cut serrator features a stainless steel blade, brass rivets and a smooth easy to grip wood handle. Its the ideal tool for cutting vegetables, like potatoes for home made French fries or anything else that needs a crinkle cut to look fancy.
Pots and Pans
Cast Iron – These old classics come in many sizes today. I only still use one, a very large and very deep pan. This pan is perfect for deep fried chicken. Because of its heavy weight it holds the heat well keeping the oil hot. But because it’s heavy I also tend to use it less often but it has many other uses. For example it’s perfect for home fries, eggs and bacon. When new this pan may need to be “SEASONED”. Cover entire with vegetable oil and place in a 350° oven for 30 minutes. To clean this giant just use warm water as soap will remove the protective oil. Someone told me the best seasoning to use is bacon grease. This pan improves cooking flavor over time. Used for frying chicken or in recipes like Buffalo Chicken Sandwich. I also have a cast iron pot that is used on camping trips.
I even heard somewhere that you get the extra benefit of of the much needed mineral of iron just from cooking in it. It also seems that since people stopped using them to cook in regularly we might have to take a pill sometimes or eat spinach to get that in our system! Huh, its just what I heard and I don’t really know how true that is but I found it “interesting”.
Porcelain – Porcelain covered pots come in many beautiful colors now and can be very attractive hanging up in the kitchen. These pots are also nice to cook in. I found one of mine at a garage sale and even received one as a gift! HAHAHA! Fit this in your suitcase to take home! Well yes I did! I love it now but cursed as I carried it through the airport in my carry on!
Dutch oven – This is a large Porcelain coved pot. Just like the aforementioned airport verity. It is 7 to 9 quart cast iron (heavy) pot that is ceramic covered and with a lid (for extra heaviness).
Teflon – This Dupont non-stick classic cookware always looses it non-stick effectiveness. The best way to make your non-stick cookware lasts it’s longest is with a few simple tips. First never use metal cooking utensils such as metal spatulas or folks. Many, if not all-cooking utensils come in Teflon friendly products. I own plastic spatulas, wooden spoon and tong are just a few items that should be used to cook in these type of pots and pans. Also putting Teflon pots and pans in the dishwasher shorten their life. Clean all Teflon items by hand using a sponge or brush with mild dish soap such as Dawn (product plug only because I like that commercial where they help clean off those cute little oil covered ducklings with Dawn).
Teflon pots and pans come in MANY brands and qualities. I have owned several different styles over the years. I still have one large pan left that I use for omelets. They have to be replaced regularly because they ALL seem to loose there non-stick surface after a while. I keep a couple different sizes and I buy deferent qualities pans depending on their eventual purpose. The small pans I buy the least inexpensive. I always try to keep three good ones on hand. One is large (12 to 14 inches is huge for an Irishman). This one is in great condition (the pan, not me) and used to make eggs and other things that stick to other pans. So I don’t use this pan for grill cheese, or burgers, Steaks, etc. The other pans are smaller and less expensive. These I replace more often, and I use these for eggs for one person when new and eggs begin to stick to it I replace it.
Lately I have purchased the new Gotham Steel copper color ceramic nonstick frying pans. I like the 9.5 for making eggs. These seem to last longer then their Teflon cousins but I never really made note of it for sure. So I don’t want all those DuPont people coming after me hold their pans like torches so it resembles a scene from the movie Young Frankenstein!!
In the category of Teflon pots, I also own one. This is stickily for things like cheese sauce and that pot even has a pouring lip on it. I have had this small “Calphalon Sauce Pan” for 20 years! They still make it and its even found on Amazon.
Stainless steel Pots and Pans – These Pots and Pans are almost indestructible. There is no non-stick surface to worry about and thats why they can last generations. Unlike the cast iron pans, dish detergent and scouring pad or cleaners including comet can be used to keep these pans looking like new. I use a scouring pad and cleanser on the bottom of these pans to remove heavy burn on food.
My favorite band of stainless steel pots and pans is All-Clad – These pots and pans are VERY expensive so I only own two but they will last generations. My first All-clad pan was brought at a close out store (Marshals) and was purchased with a cover at a great price maybe 15 years ago! I never saw another one the same size and at the same price again there. I do look still.
My Second favorite, if you can believe this, is Ikea 365 – The pots I purchased at Ikea are 18/10 stainless steel and seem very durable. They are also much less expensive then the All-Clad brand. They come in a verity of sizes. The first pot size is the small saucepot. The second is the medium 2-quart saucepot and I also own the large 5-quart pot. They all came with lids!
I own one Pasta Pot – this stainless steel pot comes with a strainer insert perfect for making large amounts of pasta for a big tray of Baked Ziti or Lasagnafor entertaining.
Stockpot – This huge pot can be purchased anywhere. I bought mine in an old-fashioned hardware store that carried kitchen supplies. It holds 10 quarts. Its perfect for Chicken Soup or Corn beef and cabbage.
Tea pots – Can be purchased anywhere and can even be covered with colored porcelain like the old fifties style pots. I like my stainless steel teapot because it’s easy to clean and whistles when the water boils. I am considering getting an electric one (gift hint). So many electric appliances so little time.
Measuring cups
Pyrex –this brand is glass measuring cups that come in various sizes. I recommend having on hand the one cup (16 ounce), one cup (32 ounce) and one 4 cup (64 ounces) Sizes. These are perfect for measuring liquids. I use the four cup size to make pancakes. They are dishwasher safe. Used for liquid measurements in such recipes as Baked Beans.
Stainless steel stacking – 18/10 stainless steel cups designed to balance without tipping. Cup sets should include 1/4, 1/3, 1/2 and 1-cup measures and be dishwasher safe.
Plastic stackingdry measuring – These are only a necessity if you are planning on making the friendship bread recipe that requires them. I also like then because they are light weight. So of course I own more then one set!
Plastic Liquid measuring – I own these too and use them MOST often because they are light weight. Mine have lasted years and always wind up in the dishwasher. They are made by OXO.
Measuring spoons
Stainless steel liquidmeasuring cup– I have one that is 4 cups. Because its metal with a plastic covered grip I sometimes use this to serve gravy in on non formal occasions. I really need one of those insulated gravy servers. Just sayin.
Knives – I have two knife blocks on my counter. Plus I own a chef’s knife roll. I received that as a Christmas gift that was purchased for me at a chefs supply store but you can find many types on Amazon too. My knife carrier is filled with the knifes I have collected from estate and garage sales. Knives is one of those things you should try many different kinds of to find the ones you like the best. Some of the best knives are made by Dexter Russell USA. Good knives make great gifts too. The really good ones can be really expensive but the sharper the knife the LESS likely you will be to cut yourself. Picking out good knives is a whole video lesson unto itself….Here are a few essential ones to own”
Butter knife/place knife – we often referred to this knife as a butter knife growing up. The most common use being to put butter on your bread, vegetables or when cooking with butter in recipes such as Apple Cake. It is a relatively dull knife with a rounded tip. It comes standard in most flatware sets.
The following is usually in the standard knife block: Serrated bread Knife – This is the best style/type knife for slicing fresh bread, rolls or for slicing cake in recipes like Ice Box Cake. Pairing knife – Carving Knife – Boning knife – Steak knives –
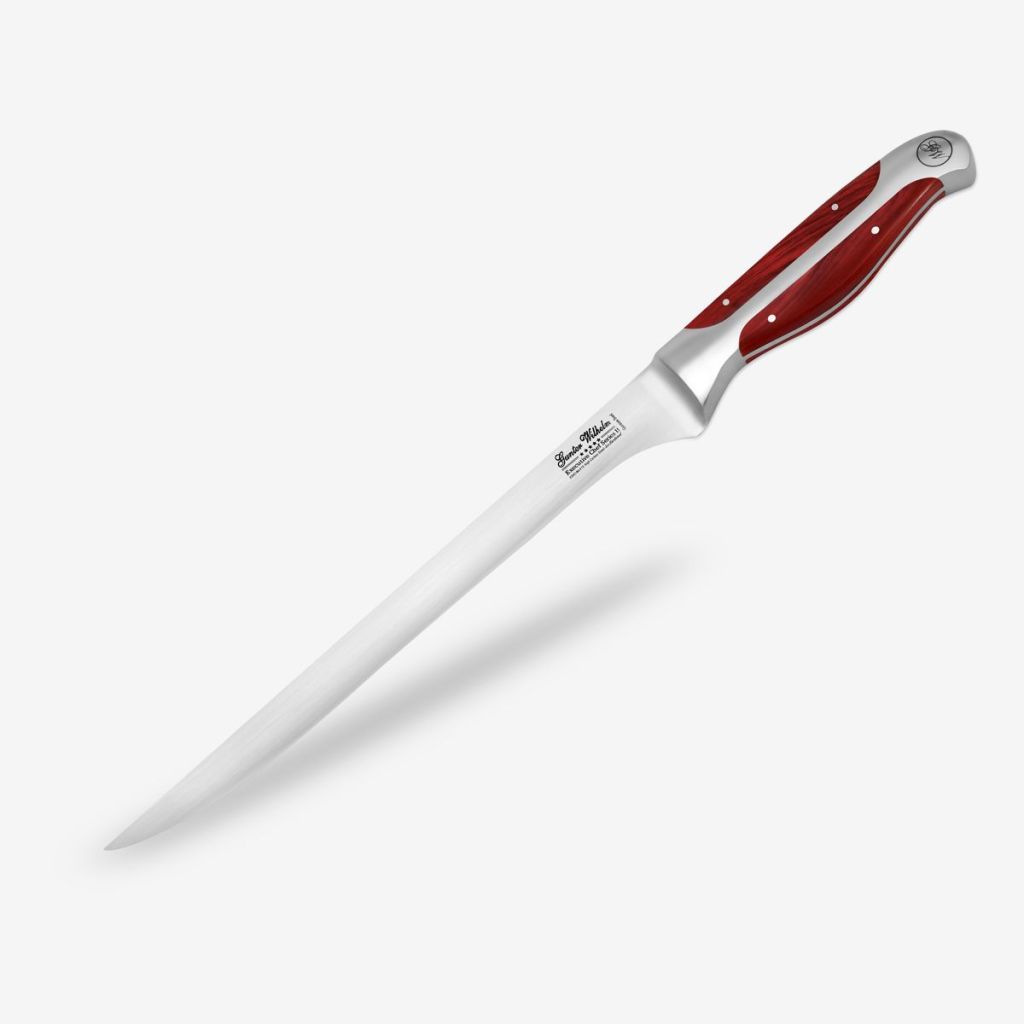
SpecialtyKnives – Filet Knife
Filet knife
Spoons
Teaspoons – flatware set Tablespoons – flatware set Wooden spoon – avoid getting hit by them, they hurt. Plastic serving spoons –Metal serving spoons – For HOT food Metal slotted spoon – for Hot Food
Pancake Turner or spatula
They come in MANY shapes and sizes. The ones pictured below are just two of my all time favorites. I have at least 10 spatulas that I have gathered over the years. Some I just use at the BBQ grill for burgers and others were plastic and for use with the Teflon pans that I no longer own.
Whisks
I only have two sizes. One is a large balloon whisk and the other is smaller and I use that one MOST often for sauces or sometimes even eggs and should get a second one of that one. Most times I use mix with a fork however.
Bakeware
Pie Pans – I prefer Pyrex glass pie pans for their even heat, dishwasher safe and classic look. Dark metal pans are ok. Tin pie pans tend to burn the bottom of the pie more easily.
Cake Pans – Williams-Sonoma has heavy nonstick cake pans that promote even baking and browning, feature a straight side and ensure that cakes are released easily. The uncoated Cake Pans from Chicago Metallic’s Commercial line performs wonderfully, and has the added benefit of being dishwasher- safe. Cake pans should be purchased in many sizes and shapes. I recommend two 9-inch-round baking pans for making a layer cake.
Square cake pan are not only used for cakes but brownies, and crumb cakes. Sizes range from 13x9x2 for crumb cake, 9x9x2 for brownies.
Bundt and tube pans –
Bundt and tube pans allow a hurried cook to make a beautiful, tall cake without the worry of layers. The secret is the funnel, which cooks the cake from the inside out. Bundt pans usually have some sort of cut-crystal design molded into the pan and have tall sides with a hollow tube in the center.
A tube pan, or angel food cake pan, has a funnel in the center, too, but the sides of this pan are smooth, which allows the batter to climb up the walls of the pan as it bakes. Tube pans often have feet, which are little metal nubs that stick out above the rim of the pan, allowing the pan to be flipped over while it cools without smashing the cake inside. If your tube pan doesn’t have feet, chances are the tube center is higher than the sides of the pan, which will give you the same clearance that feet would. Angel food cakes need to cook this way so that they don’t collapse in the pan.
Loaf Pans
Loaf pans come in two standard sizes: 9 x 5 x 3 inches and 8-1/2 x 4-1/2 x 2-1/2 inches. You can find loaf pans made of glass, shiny metal, and nonstick aluminum. Glass pans and dark, nonstick pans have a tendency to brown your breads a bit faster than shiny metal, so lower the oven temperature by 25 degrees if you use these pans.
Sifter/Sifting – You can sift flour by purchasing this Kaiser metal sifter. You can also use a strainer and tap the side against the palm of your hand. Used in recipes like Banana Cake.
8” frosting spatula – this great spatula is great for spreading frosting on cake. It can purchase these on-line or at most good kitchen supply stores. This is used in recipes like the Ice Box Cake.
apple peeler/corer – This Peels apples as well as cores them. The apples are all evenly sliced but I think they are too thin for the apple pie or apple cake.
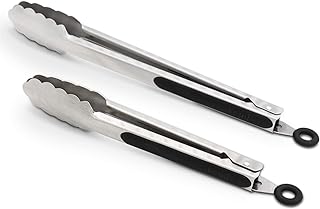
Tongs
The first pairs I would recommend is getting ones that are 12 inch long like the ones below (I have two pair of those). The next pair should be 16 inches and I use those when frying things like chicken cutlets. My next pair is 18 inches. I like to use them when I am at the BBQ grill. I also have a couple of small pairs that, that I received as a Christmas gift, I use for serving at parties. They are only 7 inches long.
That’s it for now. Check back often for updates and I will be referring to this list in my “how to cook posts” as we go. I hope the pictures help and of course if you have any questions just ask. You can post a comment here or send an email to me if you don’t want your questions seen by everyone.
Good morning from New York. The weather today is actually supposed to warm up! Yea! I’m not much of a winner person. I guess because I like to BBQ and grill so much. I could use more sleep but cant sleep any later even if I were off and now I wait for my morning ambrosia. That wonderful cup of coffee that I’m waiting for to perk.
Last night was a simple one. Only because over a month ago I made a Beef Bolognese sauce and froze two quarts of the stuff. Something I usually never do but I thing by then we were sick of eating pasta way too often. I know that sounds crazy but it’s true.
I first put on a big pot to boil with salt and a little olive oil. Then I defrosted the sauce in the microwave. I put the sauce in a medium size pot and heated it up on low. Water in my house takes FOREVER to boil. That why I have a Sunbeam “Hotshot” hot water dispenser when I want tea or hot chocolate. That’s a good item to include for my appliance must haves.
Once the water boiled ka-pow I added the pasta to it. While that cooked, I make some very good Italian string beans I purchased in the frozen food section at my local Stop and Shop (at least I made a vegetable that wasn’t salad!). I heated them up in some drawn butter (I’m try to cut down on fat hahahaha).
It was good, quick and easy. Then I needed a nap but didn’t. We just went to bed early.